Visual workflow is a powerful feature provided by Salesforce to minimize the code in your organization. By using it you can create, update, delete records every thing just drag and drop. After Spring’14 release a new workflow action called a flow trigger, by using it you can launch flow when the workflow rule criteria are met.
Business Use case
Every lead is very important for any organization. User can create lead in Salesforce by using user interface, web-to-lead or through data loader. Users in Universal container want to create lead through email, like whenever user send an email to Salesforce they want to create lead in Salesforce like email-to-case.
Solution of above business use case
Here I will use Email-to-case feature and Visual workflow to fulfill this requirement, I will not use single line of apex code. It’s very easy to implement, any Salesforce admin also can implement this for their organization. I will first configure email-to-case then I will use visual workflow to create lead and delete case, that is created by email-to-case. To implement this for your organization follow the below instructions
1) Add one more value (Lead) in Case Origin drop-down, by follow the path Name | Setup | App Setup | Customize | Cases | Fields same like below screen shot
2) Setup a new Email-to-Case, In Case origin drop-down select Lead as shown in below screen shot
You will get an email from Salesforce to specified email address in email-to-case with a verification link, click on it and verify your email address. Now you can raise a case thorough email. When ever you create a case via email, Email of subject –> Subject (Case Object), Body of email –> Description (Case Object), Case Origin set whatever you selected in email-to-case configuration (In our case it’s Lead), Email –> Web Email (Case Object), Name –> Web Name (Case Object)
3) Next task is convert Case into lead and delete case from Salesforce. To do this we can use visual workflow. Follow the below instruction to create visual workflow
- Click on Name | Setup | App Setup | Create | Workflows & Approvals | Flows
- Click on New Flow, it will open flow canvas for you
- Drag & drop Record Lookup onto canvas, Enter Name as per your wish Salesforce will populateunique name for you. We will filter out our lead by using Origin = ‘Lead’. To create lead it’s require Last Name and Company Name , but we have to save description as well and to delete case we it’s require case ID. basically we have to create four variable to store these four (Last Name, Company Name, Description, Case ID). Same like below screen shot
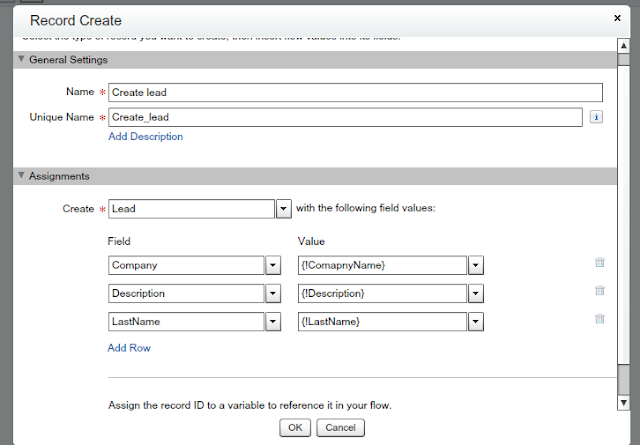
4) Now create lead record, to do that drag and drop Record Create into canvas and enter Name. Select object Lead and assign value as shown in below screen shot
5) Now delete case record, to do that drag and drop Record Delete into canvas and Fill the form like below screen shot
Finally it will look like below screen shot, click on icon that mark in red to set as start point. Save this flow and close it.
6) Now copy flow URL as shown in below screen
7) Now create a button to call flow as ( New workflow action called a flow trigger, which launches a flow when the workflow rule criteria are met. We can use after Spring’14 release, to use it your Salesforce administrator will have to request Salesforce.com as it’s under Pilot program). Button on case will look like below screen shot
It’s time to test this feature
Now open your email and send an email to Email Services Address that you got after email-to-case setup, like below email, I assume that In Subject user will use Company Name
It will create a Case in Salesforce, For time being click on button to create lead and delete this case.
Note:- This is just my though and I did something. Please share your views on it. You can remove button and write a workflow with condition then it will fire flow action, when Case-Origin equal Lead. You can do all this after Spring’14release, your administrator have to request to Salesforce to enable feature fire flow from workflow rule.


Post a Comment