Articles by "Visual Workflow"


After Spring’14 release you can be able to post in  Chatter Group Directly from your mail inbox. It’s doesn’t require your Salesforce credentials. You can can only email your posts to Chatter groups that you have access to. So what about Post to Chatter by sending an email feature. Salesforce doesn’t have any out-of-box features for this. In this article I will show you how you can easily develop this app for your organization without writing a single line of code.
Business Use case :- Higher management in Universal Container wants a way to post to chatter by sending an email.
Solution of above business requirement
To solve above business requirement I will use Email-to-caseVisual workflow and Flow Trigger. I will not use a single line of apex code.  It’s very easy to implement, any Salesforce admin also can implement this for their organization. I will first configure email-to-case then I will use Visual workflow and Flow Trigger to create Chatter Post. Before proceeding you have to understand FeedItem objects in Salesforce.  For text post we need these three values
1) Body :- This is the message that appears in the feed.
2) ParentId :- ID of the object type to which the is related. For example, set this field to a UserId to post to someone’s profile feed, or an GroupId to post to a specific Group.
3) Type :-  The type of FeedItem . In our case it’s Textpost.
4) CreatedById :- It’s field contains the ID of user who is creating Chatter post.
To implement this for your organization follow the below instructions
1) Add one more value (Chatter) in Case Origin drop-down, by follow the path Name | Setup | App Setup | Customize | Cases | Fields same like below screenshot
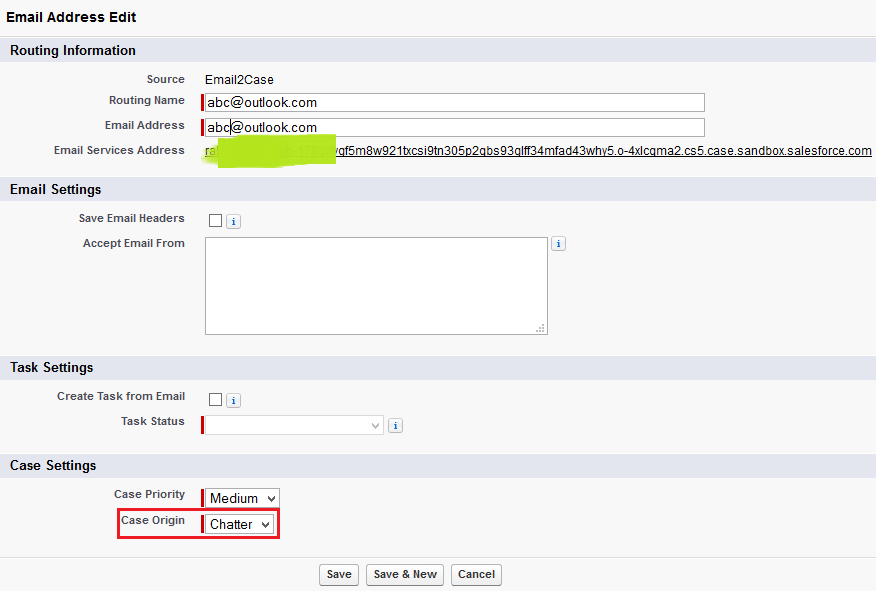
2) Setup a new Email-to-Case, In Case origin drop-down select Chatter as shown in below scree shot


Setup Email-to-Case
Setup Email-to-Case

You will get an email from Salesforce to specified email address in email-to-case with a verification link, click on it and verify your email address. Now you can raise a case thorough email. Whenever you create a case via email, Email of subject –> Subject (Case Object),  Body of email –> Description (Case Object),  Case Origin set whatever you selected in email-to-case configuration (In our case it’s Chatter), Email –> Web Email (Case Object), Name –> Web Name (Case Object).
3) Click on Name | Setup | App Setup | Create | Workflows & Approvals | Flows
4) Click on New Flow, it will open flow canvas for you. Create Three text type variable UserID, EmailAddress andDescription (to pass email address from the case, Description to pass body of email through Workflow Rule Flow Trigger action) as shown in the below screenshot


Variables
Variables

5) In this step we will verify weather EmailAddress associated to any of the user’s account or not. To do that drag and drop a Record Lookup( Give the name Get User ID) onto the window and map the fields according to below details
  • Select Object User
  • Enter criteria Email= {!EmailAddress} (Variable)
  • Save ID of user in a variable ID= {!UserID} (Variable), as shown in the below screenshot


Get User ID
Get User ID

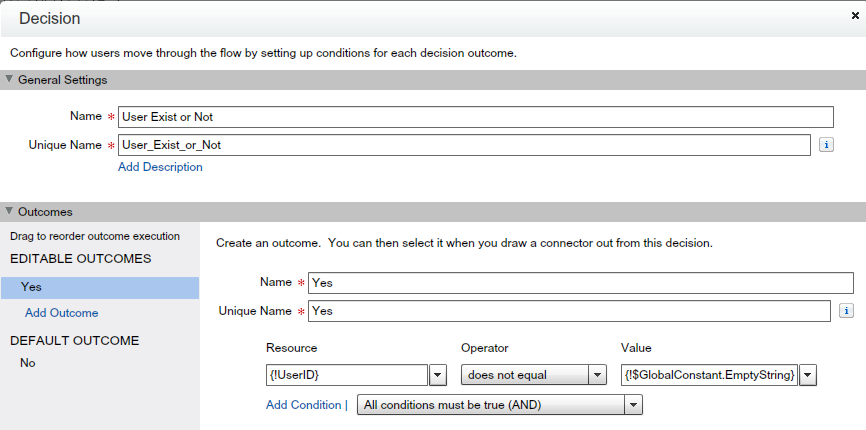
6) Next step is to verify weather variable {!UserID} have some value or not. If it’s null then it means no user exists with the same email (From email comes) address so discard the email. To do that drag and drop a Decision Element( Give the name User Exist or Not) onto the window and one Outcome same as below screenshot


Decision to know weather user exist with same email address

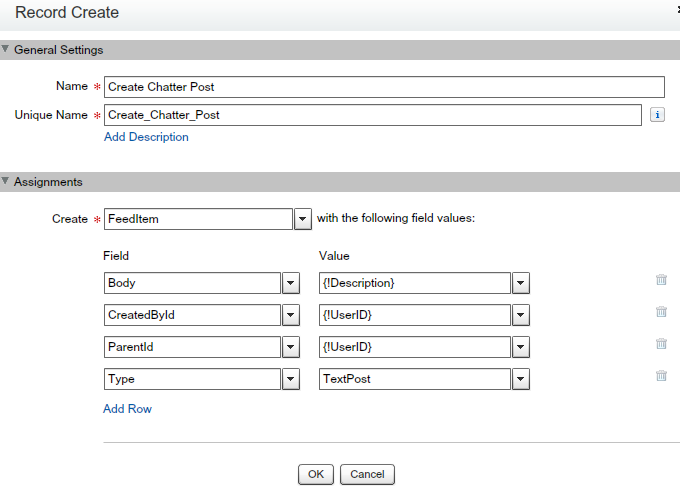
7) Final step is to create Chatter Post. To do that drag and drop a Record Create( Give the name Create Chatter Post) onto the window and map the fields according to below details
  • Select Object FeedItem
  • Map the field Body= {!Description} (Variable)
  • CreatedById= {!UserID} (Variable)
  • ParentId= {!UserID}(Variable)
  • Type= TextPost, Don’t save Id of record into any variable. You can take help from below screenshot


Create Chatter Post
Create Chatter Post

7) Finally our flow will look like below screenshot
Post to Chatter by sending an email Flow
8) Save the flow with name (Email to Chatter Post)  and close the canvas.
Create Workflow rule to fire our Flow
Our next task is to create a workflow on Case object on create an event. To create a workflow on the Case object follow the below instructions
1) Click on Name | Setup | App Setup | Create | Workflows & Approvals | New Rule
2) Select object Case from the drop-down
3) Enter Name, for Evaluate the rule when a record is select Created, For Rule Criteria select is Case Origin=Chatter, as shown in the below screenshot


Workflow Rule on Case Creation when Case origin equals Chatter

4) Add one Immediate Workflow Actions i.e. New Flow Trigger and Select Flow and set Variable (EmailAddress, Description) value as show in the below screenshot


New Flow Trigger Action

5) Save the workflow and activate it.
It’s time to test this feature
To test this application follow the below steps
1) Copy Email Services Address from email-to-case
2) Open your email account (Email address that is related to your Salesforce user account)
3) Under To Address paste email Services Address type subject and under email body write a comment that you want to post to chatter, same as below screenshot


Email (Post to Chatter by sending an email)

4) Now login into Salesforce Navigate to Chatter tab and check your post, below is the proof


Post to Chatter by sending an email

Announcement:- If you like this blog or you have a question please leave your comments, I’ll try to answer it. Thanks for your time to read my article.


Chatter Topics helps you to associate your updates with other posts and comments on the same topic by using ahashtag (#). By using hashtags, you create a topic link that categorizes your update so other users in your company can find it more easily. You can also use Chatter Search to find updates and comments that match the Chatter Topicyou are looking for. Now I am coming to the point way to delete Topics in SalesforceIn Salesforce document it’s mentioned People with the “Modify All Data” or “Delete Topics” permission can delete topics using the Chatter APIor the SOAP API. Another way to delete Topics is use Developer console or Workbench.
Business Use case :- Higher management in Universal Container wants to develop an application, from where they can easily delete Topics. Their system administrator frustrated from the old way from where every time they have to query to delete topics by using Developer console or Workbench.
Solution of above business requirement
Again this is power of Visual Workflow, we will create an app without using a single line of code. Our app starts with a screen where the user can enter topic he/she want to delete, as soon as he/she can delete next topic will delete from Salesforce. To develop add functionality follow the below instructions
  • Click on Name | Setup | App Setup | Create | Workflows & Approvals | Flows
  • Click on New Flow, it will open flow canvas for you
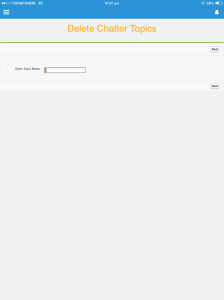
  • Drag and drop a Screen ( Give the name Enter Topic) on the window,add one field ( Give the nameEnter Topic Name) and make it required as shown in below screenshot


Enter Topic Name
Enter Topic Name

  • The next work is deleting entered topics. Before going ahead you have to understand about TopicsObject. It represents a topic on a Chatter post or record.
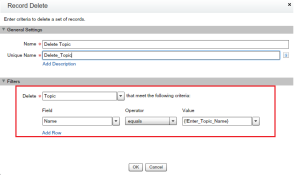
  • Drag and drop a Record Delete ( Give the name Delete Topic) on the window. Under object selectTopic, and map Name –> Input field from last screen. as shown in below screenshot


Delete Topic
Delete Topic

  • Finally our flow will look like below screenshot


Flow for delete topic

  • Save the flow and close the canvas.
Add Visual workflow into the home page component
We can call flow from custom button, link, sub-flow, Visualforce page. Here we will call our flow from the home page component. To do that follow below instruction
  1. Create custom link from Name | Setup | App Setup | Customize | Home | Custom link
  2. Add custom link in the Home page component
  3. Add Home page component into the Home page layout


Add flow on hope page layout
Add flow on home page layout

It’s time to test this feature
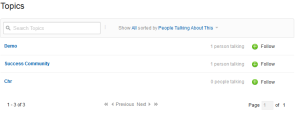
Now we will delete Chatter Topics through our app. Currently I have three topics in my Org you can see below screenshot.


Topics available in my org

Open our app and enter Topics  that you want to delete. In my case I am going to delete Topics  chr and click on theNext, as shown in below screenshot


Enter Topic Name and click on next

Now check Topics, as shown in below screenshot


Final Output
Proof of concept

Note :-When deleting topics, consider below points
  1. Topics are hard deleted. They aren’t sent to the Recycle Bin.
  2. Deleted topics are removed from search results, the topics list, all posts and records, Recently Talked About topics, Related Topics, and your users’ favorites. Deleted topics are removed from Trending Topics after the next calculation.
  3. Deleted topics are not blacklisted. Users can reintroduce a topic after it’s been deleted.
Use this app on Salesforce1
  • To use this app on Salesforce1 , create a Visualforce Page, Select Available for Salesforce mobile apps check box and embed your Flow and crate a Visualforce Tabs to call it. Below is the sample code for your reference
<apex:page >
<br/>
<Center><Font size =”6″ color =”orange”>Delete Chatter Topics</font></Center>
<br/><br/>
<flow:interview name=”Delete_Topics”/>
</apex:page>
  • Now navigate to Name | Setup | Administration Setup | Mobile Administration | Mobile Navigation
  • Add you Visualforce Tabs into selected pane, as shown in below screenshot


Add Visualforce Tab into Mobile Navigation

It will look like below Screenshot on Salesforce1 App


Delete Topic App on Salesforce1


In Salesforce Cloning is the process of creating records with the same details. Salesforce provides the out-of-box feature to clone object records. It’s a way to create record with similar data and save your precious time. Now I am coming to the point, if some one say’s that they want to clone account with opportunity then you will first think about apex Trigger but no there are other ways this.e Visual Workflow. In this article I will demonstrate how efficiently you develop a deep clone feature for your org.
Business Use case :- Business users in Universal container want a way to clone account with opportunity (Only closed won) and set Close date on the new opportunity to today plus 15days. They have only one closed -won opportunity on each account.
Solution of above business requirement
I took above example only for demo purpose. It may possible your organization maintaining accounts in different ways as mentioned in above business use case. In this blog I will use Visual workflow to solve above business requirement. First of all list down all fields that required to create an account and opportunity, for me to create an account and opportunity it’s required below fields it may vary based upon the custom validation rule
Account
Opportunity
Name
Name
Employee
Stage
Phone
Close Date
Account Name
 To develop add functionality follow the below instructions
  • Click on Name | Setup | App Setup | Create | Workflows & Approvals | Flows
  • Click on New Flow, it will open flow canvas for you
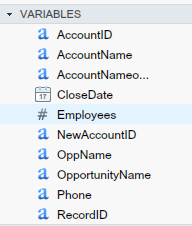
  • First create a variable with name AccountID to pass account ID, create variable for all fields as shown in below screenshot. In CloseDate variable set default value is {!$Flow.CurrentDate} it means today’s date

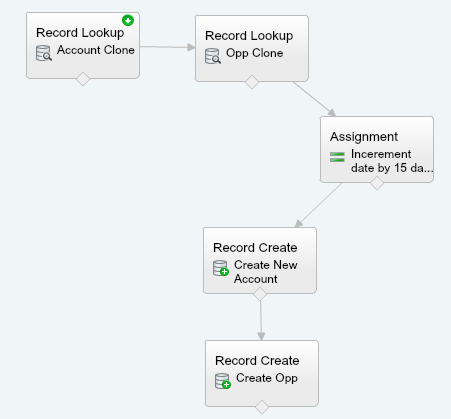
  • Drag and drop a Record Lookup ( Give the name Account Clone) on the window, to save account field values in variables that you created, as shown in below screenshot

  • Likewise drag and drop another Record Lookup ( Give the name Opp Clone) on the window, to save opportunity field values in variables as shown in below screenshot

The next task is increment  CloseDate variable by 15days, to do this drag and drop an Assignment(Give the name Increment date by 15 days) on the window, and add 15 days as shown in below screenshot

  • Now we will create account record first, to do this drag and drop another Record Create ( Give the name Craete new account) on the window, pass the variable values in the fields and store new account id in a variable in my case it’s  NewAccountID as shown in below screenshot

  • Final steps creates opportunity record. to do this drag and drop another Record Create ( Give the name Create opp) on the window, pass the variable values in the fields. In the AccountId field pass the newly created account id i.e. NewAccountID and select Stage as per your choice, as shown in below screenshot

Finally our flow will look like below screen shot

Save the flow and close the canvas.
It’s time to test this feature
To test this feature you have to create a button on Opportunity to invoke this flow, to do that follow the below instruction
1) Click on Name | Setup | App Setup | Create | Workflow & Approvals | Flow
2) Click on your flow name and go to the detail page and copy URL link
3) Now create a detail page button on Account object and pass  Account id to variable AccountID , same as below screen shot

4) Now go to any account record that have one opportunity with status “Closed won“and click on custom button that you created on last step and see the magic.
Note:- In this demo I used only few fields but you can take as many as fields you want but you have to maintain same number of variables in flow. You can also add check what happen when account does not contains any opportunity.


In the last few articles I have gone through various ways to use Visual Workflow in Salesforce. In this article I will discuss few concepts related to Visual Workflow, that is mentioned below
  1. Validation rule in Visual Workflow
  2. Branding – How to use Image in Visual Workflow
  3. Improve Visual Workflow UI

–> Validation rule in Visual Workflow

Business Use case :- Universal container is creating a Child Donation Screen by using Visual Workflow, Screen contains Name (Text), Phone Number (Text) and Amount (Currency) fields. They want to write a validation rule  onName so user can’t enter any word other than alphabets. For Phone Number field they want a way so the user can’t able to enter more than 10 digits.
Solution of above business requirement
You can use standard Salesforce formula syntax in two places within a flow:
  1. In a Formula resource
  2. In a Screen element, specifically to validate user input for a field
We have to create a new flow.  To develop this functionality follow the below instructions
  • Click on Name | Setup | App Setup | Create | Workflows & Approvals | Flows
  • Click on New Flow, it will open flow canvas for you
  • Drag and drop a Screen ( Give the name Donation Registration) on window, and click on Add a Field ( Use Text Data type field, Give the name Name ) to enter Donor Full Name and make this field require by selecting Required check-box
  • Navigate to Input Validation section and select Validate Check-box, and write validation rules on rectangular box, as shown in below screenshot

Formula I used :- REGEX( Name, “[a-zA-Z ]*$”)
  • Now navigate to Error Message section and write the message you want to display when the formula statement evaluates to False, You can take help from below screenshot
  • You can also use Rich text editor to define error message in a different  font, size and color.
  • Likewise you can create Phone Number (Text) field and write validation rule, you can take help from below screen shot

Formula I used :- ISNUMBER (Phone_Number ) && LEN (Phone_Number ) < 11
  • Create Amount (Currency) and make this field require by selecting Required check-box.
Note:- If the formula statement evaluates to True, the input is valid. If the formula statement evaluates to False, the error message is displayed to the user.
Few points to remember
  • If flow contains an invalid formula, then You can’t activate that flow.
  • The formula expression must return a Boolean value.
  • If the user leaves the field blank, and the field is not required, no validation is performed.
  • A formula in a flow can’t contain more than 3,000 characters
  • Formulas in flows don’t support the below mentioned functions. Using these functions results in your formula returning Null (GETRECORDIDS, IMAGE, INCLUDE, INCLUDES, ISCHANGED, ISNEW, ISPICKVAL, PARENTGROUPVAL, PREVGROUPVAL, PRIORVALUE, REQUIRE SCRIPT, VLOOKUP)

–> Branding – How to use Image in Visual Workflow

Business Use case :-  Higher management in Universal container wants to user their company logo on Child Donation screen for branding purpose.
Solution of above business requirement
The Rich text editor on the screen element currently does not support Image src tags. However, the flow run-time interprets any text as HTML. So, you could store the HTML markup in a custom setting, database record or some variable,  and use that on the screen. In our current approach I am going to store Image src tags on a variable. First you upload image on static resources in Salesforce, now you have the image link, follow the below instruction to complete this process
  • Navigate to Resource tab, and create a variable with name ImageURL, Select data type as Text and under Default Value define an image tag as shown in the below screenshot


Formula I used :- ISNUMBER (Phone_Number ) && LEN (Phone_Number ) < 11
  • Create Amount (Currency) and make this field require by selecting Required check-box.
Note:- If the formula statement evaluates to True, the input is valid. If the formula statement evaluates to False, the error message is displayed to the user.
Few points to remember
  • If flow contains an invalid formula, then You can’t activate that flow.
  • The formula expression must return a Boolean value.
  • If the user leaves the field blank, and the field is not required, no validation is performed.
  • A formula in a flow can’t contain more than 3,000 characters
  • Formulas in flows don’t support the below mentioned functions. Using these functions results in your formula returning Null (GETRECORDIDS, IMAGE, INCLUDE, INCLUDES, ISCHANGED, ISNEW, ISPICKVAL, PARENTGROUPVAL, PREVGROUPVAL, PRIORVALUE, REQUIRE SCRIPT, VLOOKUP)

–> Branding – How to use Image in Visual Workflow

Business Use case :-  Higher management in Universal container wants to user their company logo on Child Donation screen for branding purpose.
Solution of above business requirement
The Rich text editor on the screen element currently does not support Image src tags. However, the flow run-time interprets any text as HTML. So, you could store the HTML markup in a custom setting, database record or some variable,  and use that on the screen. In our current approach I am going to store Image src tags on a variable. First you upload image on static resources in Salesforce, now you have the image link, follow the below instruction to complete this process
  • Navigate to Resource tab, and create a variable with name ImageURL, Select data type as Text and under Default Value define an image tag as shown in the below screenshot

Save this Flow and Activate it.

–> Improve Visual Workflow UI

If you are using Visual Workflow on Visualforce Page then you can change following things
  1. buttonLocation :- You can define location of navigation buttons in the flow user interface. Available values are Top, Bottom and Both.
  2. buttonStyle :- You can define style to the flow navigation as a set. Can only be used for inline styling, not for CSS classes
  3. FlowText :- You can define A field label.
  4. FlowCurrency :- You can define A field label.
Note:- To learn more about “Customizing a Flow’s User Interface” click on the URL.


Now create a Visualforce Page and embed your Flow. To change the  label of Text field (Name (Text), Phone Number (Text)) defines one CSS class and use it in Visualforce page
<style type=”text/css”>
.FlowText {
  color: green;
}
</style>
Likewise you can define CSS class different attributes. finally our page looks like below screenshot
You can download the full code from Github or From Chatter. let me know if you are unable to download the code.


In Salesforce a user can follow Chatter groups or Records. The chatter group manager can also add/remove peoples to the group, for this Salesforce provides out-of-the box functionality. To manage recordfollower/Subscriber Salesforce does not have any inbuilt functionality like owner want to add follower or want to remove the follower from object records.
Business Use case :- Higher management in Universal Container wants to develop an application for system administrator, so that they can use it to Add/Remove follower/subscriber to the account records.
Solution of above business requirement
First of all I want to say thanks to Andrew Johnson to share his idea and flow( Add follower to record)  he shared in success community. In this blog we will use Visual workflow to solve the above business requirement. My main aim is to show the various ways to use Visual workflow in your organization. Before going ahead with the solution you have to understand  EntitySubscription Object. It’s Represents a subscription for a user following a record or another user.User can subscribe to a record or to another user.
Field Name
Details
ParentId
ID of the record or user which the user is following
SubscriberId
ID of the User who is following the record or user
 Add Follower to record
First we will ask the end user to enter User Full Name whom they want to make a follower of the record. On the next screen we will show a list of user matches with user name entered on Screen 1 and ask them to select one, As soon as they clicked on the finish button user will be added as follower of the record. To develop add functionality follow the below instructions
  • Click on Name | Setup | App Setup | Create | Workflows & Approvals | Flows
  • Click on New Flow, it will open flow canvas for you
  • First create a variable with name AccountIDwe will use in the Flow
  • Drag and drop a Screen ( Give the name Enter Follower) on window, and click on Add a Field ( Give the name Enter Follower Name ) to enter User Full Name from user as shown in below screenshot

  • The next task is to display all users where the User Full Name match with Screen1 enter follow name field. To do that again drag and drop Screen on canvas ( Give the name Choose Follower), add Radio button ( Give the name Choose Follower Name) as shown in below screenshot

Now select Dynamic choice as shown in the above screenshot ( Give the name ChooseFollowerFromUser), under object select User , Add filters criteria Name Contains Enter_Follower_Name (Screen1 Input field),Under Choice label select Name as shown in below screenshot

  • On the next screen, our main work is find out selected user’s ID. To do that we will use Record Lookupelement ( Give the name Find Selected user ID), under Loo up select User , enter search criteria Nameequal to Choosee_Follower_Name, and store recordID into some variable as shown in below screenshot

  • The next task is to create a record into EntitySubscription object . it’s required Parentid andSubscriberId. we have SubscriberIdfor ParentID we will use AccountID variable.  Now Drag and DropRecord Create element into the canvas ( Give the name Auto add follower into the record), under create select object EntitySubscription and assign value into Parentid and SubscriberId as shown in below screenshot 

Finally it will look like below screenshot

Now create a button (Add Follower) on Account object to call this flow and assign {!Account.Id} into variableAccountID
Link will be /flow/Add_Follower_into_record?AccountID={!Account.Id}&retURL=https://ap1.salesforce.com/{!Account.Id}
Remove Follower from the record
First we will ask the end user to enter a UserID of the user’s whom they want removed as a follower (Subscriber)  from the record, as soon as they click on finish button user will automatically removed from follower (Subscriber) list to the record. To develop remove functionality follow the below instructions
  • Click on Name | Setup | App Setup | Create | Workflows & Approvals | Flows
  • Click on New Flow, it will open flow canvas for you
  • First create a variable with name AccountID and we will use into the flow
  • Drag and drop a Screen ( Give the name Remove Subscriber) on window, and click on Add a Field ( Give the name Enter Subscriber User ID ) to enter a UserID from user as shown in below screenshot

  • In the next screen we will remove this subscriber from the record. Drag & Drop Record Delete element into the canvas, and give the name Remove follower. Under delete drop-down selectEntitySubscription object and map the field as shown in below screenshot
Now create a button (Remove Follower) on the Account object to call this flow and assign {!Account.Id} into variableAccountID
Link will be /flow/Remove_follower?AccountID={!Account.Id}&retURL=https://ap1.salesforce.com/{!Account.Id}
Now it’s time to test this feature
Add Follower
1) To add follower to the record, navigate to the Accounts tab and click on any Account Name to open it’s detail page, and click on the Add Follower button as shown in below screenshot
2) Enter name of the user whom you want to add subscriber of that account record, you can take help from below screenshot  and click on Next

3) On the next screen you can select subscriber from the list of users based upon your search criteria, as shown in below screenshot and click on Next

4) You will drill down to account detail page and user will added as follower, below is the screenshot as a proof

Remove Follower
We will remove the same follower that we added on the last step.
1) To remove the follower from the record, navigate to the Accounts tab and click on any Account Name to open it’s detail page, and click on the Remove Follower button.
2) It will open Remove follower flow for you, enter UserID  whom you want to remove as a subscriber of the  record, you can take help from below screenshot and click on Next

3) You will redirect to account detail page, and the user is removed from follower list. You can check below screen shot

Note:- You can enhance Add/remove functionality by using Loop and collection  (Spring’14 pilot feature) to show the list of users that are not following record. Currently I am showing all users from an organization based on user name entered (Step 2 – Enter new subscriber name) .

MKRdezign

Contact Form

Name

Email *

Message *

Powered by Blogger.
Javascript DisablePlease Enable Javascript To See All Widget