Articles by "Process Builder"


In this article Getting Started with Process Builder: Add Chatter Followers to Record, we had discussed a way to auto add Chatter followers to account record using the Process Builder. But It will only work for System administrators or users with the Edit permission on account object. There are few business scenarios where a business wants to implantation this for all users, so that anyone can add followers without editing the account record.Let’s start with a business use case 
Business Use case :- Vigne Kozacek is working as System administrator in Universal Container. They normally grant read access to account records to account team members. He received a requirement to develop an application, that will allow users to add Chatter followers to the account record without editing it.
Solution of above business requirement
There are few solutions possible for the above business scenarioWe will use Flow and Process Builder (because it runs in system mode) to solve the above business requirement. Before proceeding ahead, you have to understandUser mode and System mode in Salesforce. 
  • System mode :- In which the object and field-level permissions of the current user are ignored.
  • User mode :- In which the permissions, field-level security, and sharing rules of the current user are enforced.
A few points to remember
  • Flow runs in user mode.
  • Process Builder runs in system mode.
  • When you launch a Flow using the Process Builder, then it will run in system mode.
Designing the application
  • We will use a custom button on the account page layout to launch a Flow (#1). Flow will capture the data i.e. Account Id and Follower Id (User Id whom they want to make a follower of the record) from the user
  • Then we will save the details in a custom object Add Follower using the Flow(#1)
  • Then we will create another Flow (#2) to add the followers to account record
  • On creation of record in Add Follower object we will trigger the Process to launch a Flow(#2), this Flow will responsible to add followers to record
Follow the below instructions to create a Flow and Process Builder to solve the above business requirement
1. First of all create a custom object (Add_Follwer__c) and few fields to Save the data, as shown in the following screenshot

Make sure that you have granted ReadCreate and Delete access on custom object to all profiles.
2. To create a Flow, click on Name | Setup | App Setup | Create | Workflows & Approvals | Flows 
3.
 Click on New Flow, it will open Flow canvas for you. Now we have to create a Text variables VarT_AcountId to store the account Id (we will pass the account Id through custom button URL) as shown in the following screenshot

4. The next step is to create a screen that allows the user to enter the follower name. To do that drag-and-drop aScreen element ( Give the name Enter Follower) onto the canvas. To add a field onto the Screen click on Add a Field tab ( Give the name Enter Follower Name ) and then add one Textbox field to enter User Full Name as shown in the following screenshot

5. The next task is to display all users where the User Full Name matches with Screen1 input field. To do that drag-and-drop Screen Element ( Give the name Choose Follower) onto canvas, add Radio button ( Give the name Choose Follower Name) as shown in the following screenshot

  • Now select Dynamic choice as shown in the above screenshot ( Give the nameChooserFollowerFromUser), select User object, Add filters criteria as Name ContainsEnter_Follower_Name (Screen1 Input field) and IsActive Equals {!$GlobalConstant.True}. UnderChoice Label select Name and under Choice Stored Value select Id as shown in the following screenshot

6. To create a record in Add_Follower__c object we will use Record Create element. Drag-and-drop a Record Create( Give the name Save the data in Add Follower object) onto the canvas and map the fields according to below details
  • Select Object Add_Follower__c
  • Enter Assignment AccountId{!VarT_AccountId} and FollowerId{!ChooseFollowerFromUser}(Dynamic Choice), as shown in the below screenshot

7. Finally your Flow #1 will look like the following screenshot

8Save your flow with name Add details to custom object and close the canvas. Don’t forget to Activate the Flow
9. The next step is to create a custom button (Add Follower) on the Account object to call the Flow and pass the {!Account.Id} into variable VarT_AccountId
Custom button URL :-  /flow/Add_details_to_custom_object?VarT_AccountId={!Account.Id}&retURL=https://ap1.salesforce.com/{!Account.Id}
10. Till now we have created a Flow to take the input from user and save the data into a custom object. Now we will create another Flow to add follower to account record. For this click on Name | Setup | App Setup | Create | Workflows & Approvals | Flows 

11. Click on New Flow, it will open Flow canvas for you. Now we have to create two Text variables VarT_AcountIdand VarT_FollowerId  as shown in the below screenshot

12. To create a record into EntitySubscription object, drag-and-drop a Record Create ( Give the name Add follower to record) onto the window and map the fields according to below details
  • Select Object EntitySubscription
  • Enter Assignment ParentId{!VarT_AccountId} and SubscriberId{!VarT_FollowerId}, as shown in the below screenshot

13. Now we have to delete the record from Add_Follower__c object that we had created to save the follower details. To do that, drag-and-drop a Record Delete ( Give the name Delete record from Add Follower object ) onto the window and map the fields according to following screenshot

14. Finally your Flow #2 will look like the following screenshot

15. Save your Flow with name Add follower to record (Type:- Autolaunched Flow) and close the canvas. Don’t forget to Activate the Flow.
Launch a Flow (#2) from Process Builder
Our next task is to create a process on the Add_Follower__c object to launch a Flow. To create a workflow on the Add_Follower__c object follow the below instructions
1. Click on Name | Setup | App Setup | Create | Workflows & Approvals | Process Builder  and click on the Newbutton, Enter NameAPI Name and then click on the Save button

2. The next step is to add entry criteria. For this click on Add Object, select Add_Follower__c object and for the entry criteria, Select only when a record is created, as shown in the below screenshot, once you are done click on theSave button
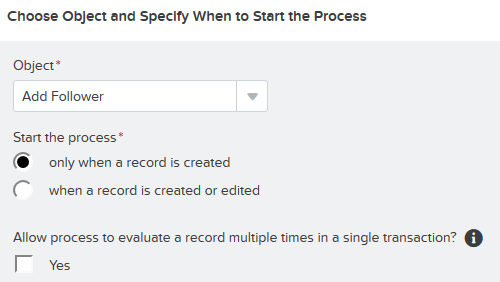
3. The next task is to add Process Criteria, To do this click on Add Criteria, enter NameType of action and for filter conditions  select No Criteria – just execute the actions! and click on the Save button, as shown in the following screenshot

4. The next step is to add an Immediate action to Process. Click on Add Action (Under Immediate actions), Select the type of action to create (In our case Flows) , and then fill out the fields to define the action, as shown in the following screenshot

5. Once you are done, click on the Save button, it will redirect you to Process canvas. Finally the Process will look like the following screenshot

Don’t forget to active the Process by clicking on the Activate button.
It’s time to test this App
1) In this demo I am going to use Demo User account (Profile assigned :- Standard User Clone, this user only hasRead access on the Account and ReadCreate and Delete access on custom object Add_Follower__c ).

2) The next step is to click on Add Follower button and follow the instructions available on Flow screen.

Finally checkout the Follower section available on the record detail page.
Note :-  I will suggest you to implement this first on your developer org test it and then move it to Production.


Till now we have created several Processes, but we haven’t tried to update an existing Process. In this article we will discuss how to update an existing activated Process or in other word you can say how to version control an existing Process in Process Builder. The Spring’15 release has rolled and now you can able to use version control in Process Builder.
What is version control?
Version control is a system that records changes to a file or set of files over time so that you can recall specific versions later. 
What is the need of version control in Process Builder ?
As you all are aware, there are no such concepts in Workflow rule then why we need a version control mechanism inProcess Builder. This is because of Process Builder is nothing but a combination of Flow and Workflow rule and we can’t modify an activated Flow. It means once you have activated a Flow and want to make some changes to the same Flow, in that case you end up creating a new version. Let’s start with a business use case
Business Use case:-  Martin Jones is working as System administrator in Universal Container. He had created a process to Auto assign Price book based on Opportunity Record Type in the article Getting Started with Process Builder Now his organization wants to implement this for one more record type, i.e. Telecommunicationsthen assign a price book Telecommunications (15 digit price book Id) :- 01sB00000006aec
Solution of above business requirement
As we discussed once Process gets activated it’s not possible to make any changes to it. Now we have two options that is save existing/activated process as
  • Version of current process
  • New Process
To solve the above business requirement, we will save existing activated Process as a new version. Follow the below instructions to modify the existing Process for the above business requirement
1. Click on Name | Setup | App Setup | Create | Workflows & Approvals | Process Builder, it will redirect you to theProcess management page
2. Click on the Process name i.e. Auto assign Pricebook based on Opportunity Record Type as shown in the following screenshot

3. Now click on the Clone button available on top right of the Process detail page, as shown in the following screenshot

4. It will popup a window where you have to select Version of current process and enter the Name, optionally you can enter Description. Finally it will look like the following screenshot

Once you are done, click on the Save button, but it doesn’t allow you to change the API Name of a Process. You can have a maximum of 50 versions of a Process.
5. The next step is to modify the Process as per the above business requirement and finally it will look like the following screenshot

Don’t forget to active the Process by clicking on the Activate button. The new version will become the active version and the others remain as Inactive.


In this article Getting Started with Process Builder – Part 2 (Time-dependent actions), I had discussed how to add aTime-based action into a Process. I also discussed a way to check the Paused and Waiting Interviews in the Flow and Process BuilderClick on Setup | Build | create | Workflows & Approvals | Flows and navigate to a sectionPaused and Waiting Interviews as shown in the following screenshot


Use Del link to remove an Interview (An interview is a running instance of a Flow) from Paused and Waiting Interviews queue, but it doesn’t allow you to mass delete/remove Paused and Waiting Interview. In this article we are going to discuss a way to mass delete/remove Waiting and Paused Interviews. Let’s start with a business use case 
Business Use case :-  Martin Jones is working as System administrator in Universal ContainerHe developed a Process to update the Account Description after 5 days of its creation. For testing purpose he has created 10 records, it means there are 10 Jobs/Interviews waiting in Paused and Waiting Interviews queue. He wants to delete all the Interviews from a Single click instead of deleting each one-by-one. Below is the Process Properties screenshot of the most active version of a Process.

Solution of above business requirement
There are multiple solutions possible for the above business scenarioWe will use Flow to solve the above business requirement. Before proceeding you have to understand below mentioned objects in Salesforce
A) FlowInterview :-This object represents a flow interview. An interview is a running instance of a Flow. 
This article will help you to understand how you can mass delete Paused and Waiting Interviews. Follow the below instructions to create a Flow for the above business requirement
1. Click on Setup | Build | create | Workflows & Approvals | Flows
2. Click on New Flow, it will open the Flow canvas for you. Drag-and-drop Record Delete Element on the Flow Canvas and fill the details as shown in the following screenshot

Once you are done, click on OK.  The question arises here why we have chosen InterviewLabel in the Preceding screenshot, why not any other fields.
  • This is because of there are a limited number of fields that you can select in Record Delete element for FlowInterview.
  • InterviwLabel field is made up with ProcessAPIName-VersionNo_ObjectName and API Name is always same for all versions of a Process
  • It also gives you the flexibility to mass delete Interviews of a specific version of a Process
3. Finally your Flow will look like the following screenshot

4. Click on the Save button and save the Flow with the name Mass delete Paused and Waiting Interviews as shown in the following screenshot

5. Don’t forget to Activate the Flow.
It’s time to test this Process
1) Currently there are 10 Interviews waiting in Paused and Waiting Interviews queue for Process “Update Description after 5 days“, as shown in the following screenshot

2) It’s time to Run the Flow to mass delete Interview those belongs to Process “Update Description after 5 days“. To do this navigate to Setup | Build | create | Workflows & Approvals | Flows and click on the Flow Mass delete Paused and Waiting Interviews, it will redirect you to the Flow detail page. Now click on the Run button, a shown in the following screenshot

3) Go back to Paused and Waiting Interviews section available on Flow Management page and check it out

Note:-  I will suggest you to implement this first on your developer org test it and then move it to Production.


Process Builder in Salesforce are a fantastic way to automate various business processes. It allows you to create a process, and based on certain criteria that you set, Salesforce can do a number of things, for example Create record,Update records, Post to Chatter, Send an email, etc. In this blog post, I will walk through setting up a process to send out an email alert. Let’s start with a business use case 
Business Use case :- Warren Mason is working as System administrator in Universal Container. His next assignment is to create a process to send out a welcome email to new users.
Solution of above business requirement
There are few solutions possible for the above business scenario, but we’ll use Process Builder to solve it. You can easily send an email from a process by using Send an email action. Email alerts are configured outside of the Process Builder and contain the standard text, list of recipients, and template for an email. In order to send an email from a process, you must create the email alert. You can use only email alerts that is associated with the same object that the process is associated with. Follow the below instructions to create a Process to solve the above business requirement
1. First of all create an Email template. To do this, navigate to Setup | Administer | Communication Templates | Email Templates, click  on the New Template button and choose the type of template you want to create. In this case select Custom HTML (without using Letterhead).  The following screenshot shows a sample email template

2. The next step is to create an Email alert on the user object. To do this, navigate to Setup | Build | Create | Workflow & Approvals | Email Alerts, click  on the New Email Alert button and enter the details as shown in the following screenshot

3. The final step to create a process on the User object to send out a welcome email to the new users. Click onName | Setup | App Setup | Create | Workflows & Approvals | Process Builder  and click on the New button, EnterNameAPI Name and then click on the Save button

4. The next step is to add entry criteria. For this click on Add Object, select User object and for the entry criteria, Select only when a record is created, as shown in the below screenshot, once you are done click on the Savebutton

5. The next task is to add Process Criteria, To do this click on Add Criteria, enter NameType of action and set filter conditions  (In this case set [User].IsActive Equals True) and click on the Save button, as shown in the following screenshot

6. The next step is to add an Immediate action to Process. Click on Add Action (Under Immediate actions), Select the type of action to create (In our case select Email Alert) , and then fill out the fields to define the action, as shown in the following screenshot

To select Email Alert, type two or more letters to search for the email alert that you want to use to send an email.
7. Once you are done, click on the Save button, it will redirect you to Process canvas. Finally the Process will look like the following screenshot

Don’t forget to active the Process by clicking on the Activate button.
Proof of concept
To test the above process creates a new user and check out your mailbox.

Note :-  I will suggest you to implement this first on your developer org test it and then move it to Production.

In Salesforce Chatter Group represent group of people. It’s a great way to boost collaboration in your organization. You can add unlimited members into Chatter Group, but a user can join maximum of 100 Groups. In this article Post Opportunity details to a Chatter Group, I had discussed how to post Opportunity closed information to a Chatter Group using the Flow and Flow Trigger. In this article we will discuss how to post a message to the Chatter Groupusing the Process Builder. Let’s start with a business use case 
Business Use case :-  Brandon Schaefer is working as System administrator in Universal ContainerHis organization wants to post a message to the Chatter Group “UC Internal Announcement“, whenever an event is created for the public calendar Universal Container Conference Rooms
Solution of above business requirement
To solve the above business requirement, we will use  Process Builder. Before proceeding we have to understandPublic Calender in Salesforce. Public calendars and resources are for managing group activities or shared resources. Using public calendars a group of people can track events of interest to all of them (such as Sales events, weekly knowledge sharing session, or training classes) or schedule a common activity (such as a team vacation calendar). For example with resource calendars multiple people can coordinate their usage of a shared resource such as a conference room etc. An organization can create an unlimited number of calendars. Our first task is to get the 15 digit record Id of public calender Universal Container Conference Rooms follow the below instructions
1. Click on Setup | Build | Customize | Activities | Public Calendars and Resources 
2. Click on the public calender Universal Container Conference Rooms and grab the 15 digit record id from the URL, as shown in the following screenshot

3. The next step is to convert the 15 digit Id into 18 digit Id. We will use this as an entry criteria in the Process Builder.
Our next task is to create a Process on Event object to post a message to the Chatter group. To create a Process on the Event object follow the below instructions
4. Click on Name | Setup | App Setup | Create | Workflows & Approvals | Process Builder  and click on the Newbutton, Enter NameAPI Name and click on the Save button, as shown in the following screenshot

5. Click on Add Object, select Event object and for the entry criteria, Select only when a record is created, as shown in the below screenshot and also click on the Save button

6. The next task is to add Process Criteria, To do this click on Add Criteria, enter NameType of action and set filter conditions  (In this case set [Event].OwnerId Equals 023B00000012HLlIAM and click on the Save button, as shown in the following screenshot

7. Our final task is to add an Immediate action to the Process. Click on Add Action (Under Immediate actions) and select the type of action to create (In our case Post to Chatter) , enter the Name Post to Chatter. This action allows you to post a message on User Profile or Chatter Group or on Record Chatter Feed. In this case select Chatter Group UC Internal Announcement, as shown in the following screenshot

The next step is to add a message to the Chatter post, for this you can use message TextBox. It also allows you to add fields from the object on which you have created the Process Builder, as shown in the following screenshot

It also allows you to add the existing Topics into the Chatter post. For this you can enter the Topic name in theTextBox Add Topics and select the topic you want to include in the Chatter post as shown in the following screenshot

Finally Post to Chatter action will look like the following screenshot

8. Once you are done, click on the Save button, it will redirect you to Process canvas. Finally the Process will look like the following screenshot

Don’t forget to active the Process by clicking on the Activate button
It’s time to test this App
Now onwards if a user creates an event for the public calendar Universal Container Conference Rooms, then Process Builder will automatically post a message in the Chatter group UC Internal Announcement. To create an event for public calendar Universal Container Conference Rooms follow the below instructions
1. Click on the Home tab then navigate to Calendar related list and click on the Single User View.
2. Now click on the Change link to change the calendar view from single user to the public calendar, as shown in the following screenshot

3. Now select the public calendar Universal Container Conference Rooms as shown in the following screenshot

4. The next step is to create an event. For this click on the New Event button once you are done, navigate to the chatter group UC Internal Announcement and check out the Chatter group wall, it will look like the following screenshot

Note:-  Process Builder is only allows you to post message type TextPost. If you want to post LinkPost or PollPost then in that case you have to use Flow and Process Builder.

MKRdezign

Contact Form

Name

Email *

Message *

Powered by Blogger.
Javascript DisablePlease Enable Javascript To See All Widget