Articles by "Salesforce1"


Chatter Topics helps you to associate your updates with other posts and comments on the same topic by using ahashtag (#). By using hashtags, you create a topic link that categorizes your update so other users in your company can find it more easily. You can also use Chatter Search to find updates and comments that match the Chatter Topicyou are looking for. Now I am coming to the point way to delete Topics in SalesforceIn Salesforce document it’s mentioned People with the “Modify All Data” or “Delete Topics” permission can delete topics using the Chatter APIor the SOAP API. Another way to delete Topics is use Developer console or Workbench.
Business Use case :- Higher management in Universal Container wants to develop an application, from where they can easily delete Topics. Their system administrator frustrated from the old way from where every time they have to query to delete topics by using Developer console or Workbench.
Solution of above business requirement
Again this is power of Visual Workflow, we will create an app without using a single line of code. Our app starts with a screen where the user can enter topic he/she want to delete, as soon as he/she can delete next topic will delete from Salesforce. To develop add functionality follow the below instructions
  • Click on Name | Setup | App Setup | Create | Workflows & Approvals | Flows
  • Click on New Flow, it will open flow canvas for you
  • Drag and drop a Screen ( Give the name Enter Topic) on the window,add one field ( Give the nameEnter Topic Name) and make it required as shown in below screenshot

  • The next work is deleting entered topics. Before going ahead you have to understand about TopicsObject. It represents a topic on a Chatter post or record.
  • Drag and drop a Record Delete ( Give the name Delete Topic) on the window. Under object selectTopic, and map Name –> Input field from last screen. as shown in below screenshot

  • Finally our flow will look like below screenshot

  • Save the flow and close the canvas.
Add Visual workflow into the home page component
We can call flow from custom button, link, sub-flow, Visualforce page. Here we will call our flow from the home page component. To do that follow below instruction
  1. Create custom link from Name | Setup | App Setup | Customize | Home | Custom link
  2. Add custom link in the Home page component
  3. Add Home page component into the Home page layout

It’s time to test this feature
Now we will delete Chatter Topics through our app. Currently I have three topics in my Org you can see below screenshot.

Open our app and enter Topics  that you want to delete. In my case I am going to delete Topics  chr and click on theNext, as shown in below screenshot

Now check Topics, as shown in below screenshot

Note :-When deleting topics, consider below points
  1. Topics are hard deleted. They aren’t sent to the Recycle Bin.
  2. Deleted topics are removed from search results, the topics list, all posts and records, Recently Talked About topics, Related Topics, and your users’ favorites. Deleted topics are removed from Trending Topics after the next calculation.
  3. Deleted topics are not blacklisted. Users can reintroduce a topic after it’s been deleted.
Use this app on Salesforce1
  • To use this app on Salesforce1 , create a Visualforce Page, Select Available for Salesforce mobile apps check box and embed your Flow and crate a Visualforce Tabs to call it. Below is the sample code for your reference
<apex:page >
<br/>
<Center><Font size =”6″ color =”orange”>Delete Chatter Topics</font></Center>
<br/><br/>
<flow:interview name=”Delete_Topics”/>
</apex:page>
  • Now navigate to Name | Setup | Administration Setup | Mobile Administration | Mobile Navigation
  • Add you Visualforce Tabs into selected pane, as shown in below screenshot

It will look like below Screenshot on Salesforce1 App


In Salesforce Queue and Public Group represent group of users. We can add any number of users to Queue orPublic Group. There is no limitation on the number of members per Public Group. This is a daily job of Salesforce admin to Add/Remove users from a queue or public group. As you aware that Form Salesforce1 or SalesforceA app we can’t Add/Remove user from the Queue or Public Group. Now let’s start with a business requirement.
Business Use case :- Higher management in Universal Container wants to develop an application for Salesforce1, from where they can easily Add/Remove user from the Queue or Public Group.
Solution of above business requirement
Again this is power of Visual Workflow, we will create an app without using a single line of code. Before proceeding you have to understand Group and GroupMember objects in Salesforce.
  1. Group :- This Group object represents Queue and Public Group both. Groups are sets of users.  They can contain individual users, other groups, the users in a particular role. By using Type field you can distinguish between Queue and Public Group. For Public Group (Use Type = Regular) and for Queue(Use Type = Queue).
  2. GroupMember :- Represents a User or Group that is a member of a public group.
In our app user will first select, where they want to add/remove user Public Group or Queue then enter User Name in same screen. On the next they will get an option to select Public Group or Queue, User that matches with the User Name entered in the previous screen and action they want to perform Add or Remove. To develop add functionality follow the below instructions
Note:- In this article I will discuss only about add/remove user into Public Group. In similar fashion you can develop for queue. I will also provide Unmanaged package of my app so you can play it within your dev org.
1. Click on Name | Setup | App Setup | Create | Workflows & Approvals | Flows
2. Click on New Flow, it will open flow canvas for you
3. Drag and drop a Screen ( Give the name Select Public Group or Queue and User) on the window,add two fieldswith below details
Name
Data Type
Value
Required
Select Public Group / Queue
Dropdown List
Public Group
Queue
Yes
Enter User Name
Textbox
Yes

It will look like below screenshot

4. Based on User input for “Select Public Group / Queue” field we will redirect the user to a different screen.If he selected Public Group then he will redirect to a new screen where he can see all Public Group from his organization and in case he selected Queue then he will redirect to a new screen where he can see all Queue from his organization. To do that add one Decision element and redirect user to the respective screen as shown in below screenshot


5. Drag and drop a Screen ( Give the name Select Public Group and User) on the window, Add one Dropdown List field ( Give the name Select Public Group) create a new Dynamic Choice with below details
    • Select Object Group
    • Enter criteria Name!= {!$GlobalConstant.EmptyString} and Type = Regular In case of Queue useType = Queue
    • Save ID in some variable in my case it’s {!PublicGroupID}, same like below screenshot

  • Add Another Dropdown List field to show list of users based on User Name entered in the Screen1.create a new Dynamic Choice with below details
    • Select Object User
    • Enter criteria  isActive= True and Name!= {!Enter_User_Name} (Screen1 User Name input field)
    • Save ID in some variable in my case it’s {!UserIDPG}, same like below screenshot

  • Add Another Dropdown List field to show the available action i.e. Add or Remove, Same like below screen shot

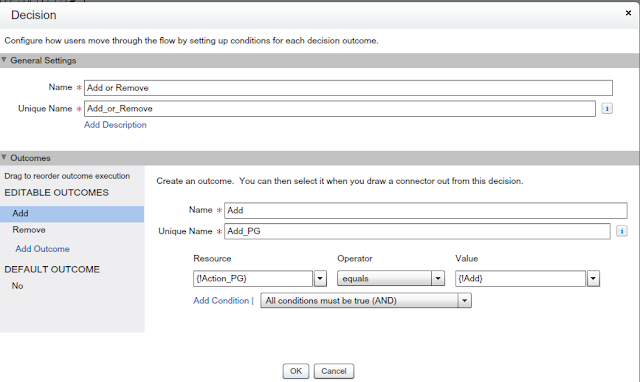
6. Now add one Decision element to decide whether users want to Add or Remove based on that it will preform the necessary action. We will use action field to define a decision. You can take help from below screen shot

7. The final step is performing Add or Removal action, to do this it’s requireed only two ID one is GroupID or Queue ID another is UserID.
  • To Add user into Public Group Drag and drop a Record Create onto the window, and map the fields as per below screenshot

  • To Remove user into Public Group Drag and drop a Delete Create onto the window, and map the fields as per below screenshot

Finally our flow will look like below screenshot

Use this app on Salesforce1
  • To use this app on Salesforce1 , create a Visualforce Page, Select Available for Salesforce mobile apps check box and embed your Flow and crate a Visualforce Tabs to call it. Bel0w is the sample code for your reference
<apex:page >
<br/>
<Center><Font size ="6" color ="orange">Add User Into Public Group or Queue</font></Center>
<br/><br/>
<style type="text/css">
.FlowText {
  color: crimson;
}
.FlowDropdown{
  color: limegreen;
}
</style>
<flow:interview name="Public_Group_Queue"/>
</apex:page>

  Now navigate to Name | Setup | Administration Setup | Mobile Administration | Mobile Navigation
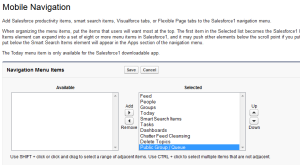
  • Add you Visualforce Tabs into selected pane, as shown in below screenshot
It’s time to test this feature
To test this app open your Salesforce1 and navigate to Apps and click on your Tab it will open a Visualforce page for you. Where you have to choose, Queue or Public Group and enter User Name whom you want to add and click onNext, It will look like below screenshot

In the next window you have to select Public Group from the list (List will show all public groups from your organization), User and action you want to perform, click on Next to complete the process. Finally It will look like below screenshot

Install this app
I am offering this app an Unmanaged package, you can install it from below URL
To install this app replace Login with your Salesforce instance name in my case this url will look like

Salesforce1 is a new platform, complete with a host of new APIs and mobile UI tools.
To oversimplify it, it's taking the Chatter mobile app, which up until this point has just been an app running on closed source code and building it into a platform, while really blowing out its capabilities. It's built on the premise that our business lives are increasingly happening in the feed. Every action from a like to a comment, now has a public API and method call behind it. More than just Chatter however, it's allows you to embed your business applications either through Visualforce or custom publisher actions (with you app hosted wherever). Salesforce1 will offer custom branding, administrator configuration, and allow for installable apps. 3rd party sales tools, service tools, marketing apps will be able to plug right into this framework.
More than just mobile, while it is the focus, Salesforce1 represents a new API-first mentality at Salesforce.com. Every action, interface, and new feature is built on top of a public API that developers can also wield and consume. Think about a list view in Salesforce, it's not something you can build without some pretty deep customization and code of your own. This UI component is not built on a public API. This is the old paradigm of Salesforce.com and Salesforce1 is the new one.


1. Embed a Flow in a publisher action


In day today life Sales people switch their job frequently, so to manage their existing or closed deal or lead we have to transfer it to the new ownerSalesforce provides various ways to change Ownership of records from one user to another. But Salesforce doesn’t provide a way to transfer records Ownership using Salesforce1 app. In this article I will show you the way by using it you can develop your own tool for transfer Ownership and it will also work onSalesforce1 app.
Business Use case :- Higher management in Universal Container wants to develop an application for Salesforce1, from where they can completely transfer record ownership from one user to another user in the mass.
Solution of above business requirement
Again this is power of Visual Workflow, we will create an app without using a single line of code. Salesforce provides various another tool that you can use for this purpose like Data Loader etc. Our app will completely transfer all records from old user to new user, you can add conditions as per your business requirements. To develop add functionality follow the below instructions
Note:- In this article I will discuss only about mass transfer of records. In similar fashion you can develop an application for transfer single record. I will also provide Unmanaged package of my app so you can play it within your dev org.
1. Click on Name | Setup | App Setup | Create | Workflows & Approvals | Flows
2. Click on New Flow, it will open flow canvas for you
3. Drag and drop a Screen ( Give the name Mass Transfer Record) on the window,add three fields with below details
Name
Data Type
Value
Required
Object Name
Dropdown List
Account
Contact
Opportunity
Yes
Old Owner
Textbox

Yes
New Owner
Textbox

Yes
 It will look like below screenshot

4. On the next Screen we will show the list of old users based on user input on the old user field on Screen-1. Now add one Dropdown List field ( Give the name Old User Name) create a new Dynamic Choice with below details
    • Select Object User
    • Enter criteria IsActive= {!$GlobalConstant.True} and Name = {!Old_Owner} (Screen1 Old Owner input field)
    • Save ID in some variable in my case it’s {!OldOwnerID}, same like below screenshot

Repeat same process for New user input field and get all users. Now add one Dropdown List field ( Give the nameNew User Name) create a new Dynamic Choice with below details
    • Select Object User
    • Enter criteria IsActive= {!$GlobalConstant.True} and Name = {!New_Owner} (Screen1 Old Owner input field)
    • Save ID in some variable in my case it’s {!NewOwnerID}.
Finally Screen-2 will look like below screenshot

5. On the next Screen-3 we will confirm the all details from the user. Do to that Drag and drop a Screen ( Give the name Confirmation) on the window,add one field Display type and add text as shown in the below screenshot

6. Now it’s time to decide which object record user want to transfer. Based on User input for “Object Name”  field onScreen-1 we will select the object and transfer the records . To do that add one Decision element and it will auto redirect to respective Record update element as shown in below screenshot

7. Final step is to transfer records for those objects from old user to new user. To do that Drag and drop a Record Update element onto the window, and map the fields as per below screenshot

Repeat same Record Update process for contact and Opportunity object. Finally our flow will look like below screenshot

Use this app on Salesforce1
  • To use this app on Salesforce1 , create a Visualforce Page, Select Available for Salesforce mobile apps check box and embed your Flow and crate a Visualforce Tabs to call it. Bel0w is the sample code for your reference
<apex:page >
<br/>
<Center><Font size ="6" color ="orange">Mass Transfer Records</font></Center>
<br/><br/>
flow:interview name="Mass_Transfer_Records"/>
</apex:page>

Now navigate to Name | Setup | Administration Setup | Mobile Administration | Mobile Navigation
  • Add you Visualforce Tabs into selected pane, as shown in below screenshot

It’s time to test this feature
To test this app open your Salesforce1 and navigate to Apps and click on your Tab (Mass Transfer Records) it will open a Visualforce page for you. In this demo I will transfer all account records where the owner is old user (Rakesh Gupta) to the new user(EMEA Sales) and click on Next In our case Screen-1 will look like below screenshot

On the Screen-2 it will show the list of user based on user input on Screen-1. Select the old user and new user from the Drop-down list and click on Next, It will look like below screenshot

On the Screen-3 it will show all the details in same screen and ask for your confirmation, if you are happy click onNext, and it will transfer all record from old user to new user. It will look like below screenshot

Install this app
I am offering this app an Unmanaged package, you can install it from below URL
To install this app replace Login with your Salesforce instance name in my case this url will look like


In Salesforce Chatter Group represent group of users. It’s a great way to boost collaboration in your organization. We can add any number of users in Chatter Group. You can add unlimited members into Chatter Group, but a user can join maximum of 100 Groups. This is a daily job of Salesforce admin to Add/Remove users from a Chatter Group. As you aware that Form Salesforce1 or SalesforceA app we can’t Add/Remove user from the Chatter Group. Now let’s start with a business requirement.
Business Use case :- Higher management in Universal Container wants to develop an application for Salesforce1, from where Chatter Group admin easily Add/Remove user from the Chatter Group. They also want to make sure if a user is already a member of Chatter group then display a message otherwise add user into the group, for removal if admin is trying to remove some user those are not a part of the chatter group then display message else proceeds.
Solution of above business requirement
I think this is a good use case to start with Visual Workflow. To solve this requirement you have to use Screen,  Record Lookup, Record Create, Record delete, Decision, Dynamic choice etc. Almost you have to use all the feature from Visual Workflow. With the power of Visual Workflow, we will create an app without using a single line of code. Before proceeding you have to understand CollaborationGroup and CollaborationGroupMember objects inSalesforce.
1. CollaborationGroup :- This object represents a Chatter group.
2. CollaborationGroupMember :- This object represent a member of a Chatter groupCollaborationGroupIdrepresent Id of Chatter Group and MemberId represent ID of the user(group member).
In our app user will first select Chatter Group, In which they want to add/remove user then enter User Name in same screen. On the next they will get an option to select a User that matches with the User Name entered in the previous screen and action they want to perform Add or Remove. Then we will check whether a user is exist in the Chatter Group as member or not. Based on action we will perform addition or removal action.  On the addition If the user is not a member of Chatter Group then add else show display message. To develop add functionality follow the below instructions
Note:- In this article I will discuss only about to add into Chatter Group. In similar fashion you can develop remove functionality. I will also provide Unmanaged package of my app so you can play it within your dev org.
1. Click on Name | Setup | App Setup | Create | Workflows & Approvals | Flows
2. Click on New Flow, it will open flow canvas for you
3. Drag and drop a Screen ( Give the name Enter Details) on the window,add two fields with below details
Name
Data Type
Required
Select Chatter Group
Dropdown List (Dynamic Choice)
Yes
Enter User Name
Textbox
Yes
 To make dynamic choice (It means show the list of Chatter group from your organization) and store in one variable{!ChatterGroupID}, as shown in the below screenshot

4. Drag and drop a Screen ( Give the name Select User Name and action) on the window, Add one Dropdown List field ( Give the name Select User Group) create a new Dynamic Choice with below details
    • Select Object User
    • Enter criteria Name!= {!$GlobalConstant.EmptyString} and Isactive= {!$GlobalConstant.True}
    • Save ID in some variable in my case it’s {!UserID}, same like below screenshot

  • Add another Dropdown List field to show the action with below details.
Name
Data Type
Value
Required
Action
Dropdown List
Add
Remove
Yes

5. Now we will check whether selected user exist as a member into requested Chatter Group. To do that add oneRecord Lookup.
    • Select Object CollaborationGroupMember
    • Enter criteria CollaborationGroupId= {!ChatterGroupID} and MemberId= {!UserID}
    • Save ID in some variable in my case it’s {!MemberID}, same like below screenshot


7. If user selected Add member action then we it will redirect to the new Decision element where we will decide User already part of the Chatter Group or It’s a new member. Her we are comparing variable {!MemberID} with 0 to decide no member exist with same detail else add. You can take help from below screenshot

8. The next task is Add member to do that Drag and drop a Record Create onto the window, and map the fields as per below screenshot

  • To Display Message Drag and drop a Screen onto the window, Add one Display Text field and type message that you want to display, you can also take help from below screenshot

Finally our flow will look like below screenshot

Use this app on Salesforce1
  • To use this app on Salesforce1 , create a Visualforce Page, Select Available for Salesforce mobile apps check box and embed your Flow and crate a Visualforce Tabs to call it. Bel0w is the sample code for your reference
<apex:page >
<br/>
<Center><Font size ="6" color ="gold">Add/Remove Member Into Chatter Group</font></Center>
<br/><br/>
<style type="text/css">
.FlowText {
  color: crimson;
}
.FlowDropdown{
  color: limegreen;
}
</style>
<flow:interview name="Chatter_Group_Member"/>
</apex:page>

Now navigate to Name | Setup | Administration Setup | Mobile Administration | Mobile Navigation
  • Add you Visualforce Tabs into selected pane, as shown in below screenshot

It’s time to test this feature
To test this app open your Salesforce1 and navigate to Apps and click on your Tab (ARM Chatter Group) it will open a Visualforce page for you. In this demo I will adduser is Rakesh Gupta to the Chatter Group (Salesforce Project)and click on Next In our case Screen-1 will look like below screenshot

On the Screen-2 it will show the list of user based on user input on Screen-1. Select the User and Action from the Drop-down list and click on Next, It will look like below screenshot

On the Screen-3 it will display message as user is already member of Chatter Group (Salesforce Project)

Install this app
I am offering this app an Unmanaged package, you can install it from below URL
To install this app replace Login with your Salesforce instance name in my case this url will look like

MKRdezign

Contact Form

Name

Email *

Message *

Powered by Blogger.
Javascript DisablePlease Enable Javascript To See All Widget