
In Spring’15 release Salesforce added a new feature on Chatter, that is Add records to Chatter Groups. In the last article “Automatically add records to Chatter Group” I had discussed the way to automate this process. In this article I am going to discuss how you can allow your users to add a record to multiple Chatter Groups and I am also going to discuss way to parse Multi-Select choice Picklist fields.
Business Use case :- Higher Management in Universal container wants to expand new feature “Add records to Chatter Groups” for their users. Basically they want a publisher action on Opportunity object that allows their users to add record to multiple Chatter Groups (Only public Groups).
Solution of above business requirement
Do you think we have to use apex code to parse values selected for multi-select choice fields in flow? I think no, this article will help you to understand way to assign multi-select choice picklist values to a collection variable in a flow or way to parse it.
Design : – when user click on publisher action on Opportunity object it will pop-up a screen, then user can select multiple Chatter groups, after clicking on Next button it will add Opportunity record to Selected Chatter Groups.
To solve this requirement we will use Visual Workflow, and then we will embed Flow to a Visualforce page to call it from Publisher action. Before proceeding you have to understand CollaborationGroup and CollaborationGroupRecord objects in Salesforce.
A. CollaborationGroup :- This object represents a Chatter group.
B. CollaborationGroupRecord :- This object represents the records associated with Chatter groups.CollaborationGroupId represent Id of Chatter Group and RecordId represent ID of the record associated with Chatter Group.
B. CollaborationGroupRecord :- This object represents the records associated with Chatter groups.CollaborationGroupId represent Id of Chatter Group and RecordId represent ID of the record associated with Chatter Group.
1. Click on Name | Setup | App Setup | Create | Workflows & Approvals | Flows
2. Click on New Flow, it will open flow canvas for you. Create two Text type variable VarTOpportunityID (To pass Opportunity ID from Publisher action) and VarTSelected_Chatter_GroupsID we will use it later on this flow.
3. Next step is allowing users to select multiple Chatter Groups. To do that drag-and-drop a Screen Element ( Give the name Select Chatter Groups) onto the window and add a Dynamic choice Multi-Select Picklist fieldwith below detail
Name
|
Data Type
|
Required
|
Active Chatter Group (Public)
|
Multi-Select Picklist
|
Yes
|

Note :- Don’t save the selected Chatter group IDs, because if you assign the results to a variable here, that variable will only store the first value selected.
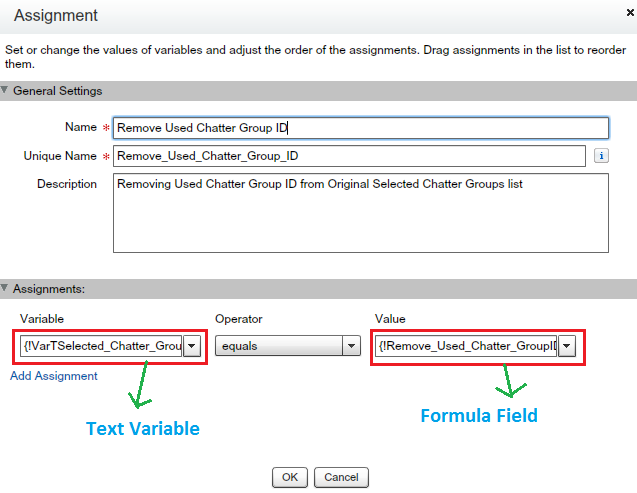
4. Next step is to assign ID’s of Selected Chatter Group to Text variable {!VarTSelected_Chatter_GroupsID} , to do that Drag-and-drop Assignment Element ( Give the name Chatter Groups IDs to Variable) onto the window and map the field according to the following screenshot

5. Next task is to create few Formula fields to calculate number of chatter groups user has selected, it’s length, Individual Chatter group ID and for Id’s that remaining to Parse. First we will create formula to calculate Lengths of ID’s of Selected Chatter Groups (Length) and Number of Chatter group selected (Counter) as shown in the following screenshot

Now create two formula fields to calculate Parsed ID (Single_Chatter_Group_ID) and Chatter ID’s those are remaining to Parse (Remaining_Chatter_GroupID) as shown in the following screenshot

6. Drag-and-drop a Record Create ( Give the name Add Record to First Chatter Group) onto the window to add record into chatter groups, if user has selected only one Chatter group. Please refer to the following screenshot for more details

7. Now drag-and-drop Decision element to check counter size. If Counter size <= 1 then leave it as it is, else we have to collect the remaining Chatter groups IDs and then add it to a Sobject Collection Variable with recordID (To add records to Chatter Groups, in our case it’s variable {!VarTOpportunityID}. Please refer to the following screenshot for more details

8. As we have already added record to one Chatter Group then we have to TRIM original length (it means remove selected Chatter group ID from variable {!VarTOpportunityID}. Please refer to the following screenshot for more details
9. Next step is to add data into a SObject Variable after parsing it. Drag and Drop Assignment Logic (Give the nameAdd data for single Chatter Group Record) on the window, to assign {!VarTOpportunityID} and formula{!Single_Chatter_Group_ID} into the Sobject variable (CollaborationGroupRecord Object Type) {!Single_Record_Deatils} as shown in the below screenshot

10. Drag-and-drop Assignment Logic (Give the name All in one) on the window and assign value from Sobject variable {!Single_Record_Deatils} to Sobject Collection variable {!All_Record_In_One} (CollaborationGroupRecord Object Type) so at the end of the flow will use it inside the Fast Create to add record to remaining Chatter Groups. Please refer to the following screenshot for more details

11. Next step is to check Counter size >= 1. If counter size is greater than 1 then repeat the process (8-10), else we will use Fast Create element add record to remaining Chatter Groups. To do that drag-and-drop decision element and check the counter size, as shown in the following screenshot

12. Finally drag-and-drop Fast Create (Give the name Add record to remaining Chatter Groups) on the window and map the field according to the below screenshot

13. Finally our Flow will look like the following screenshot
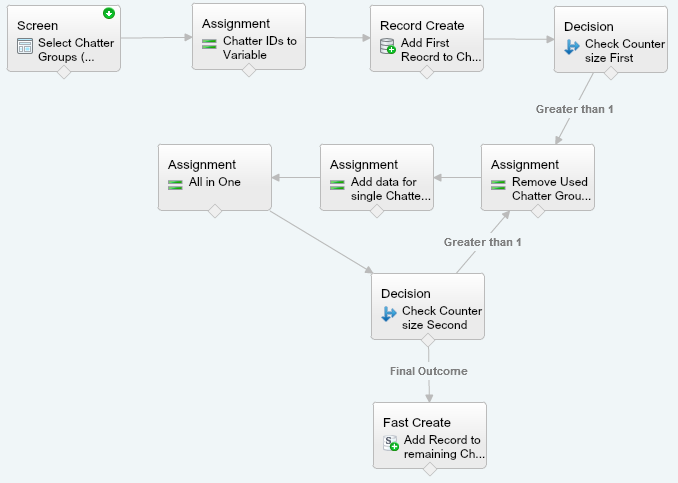
14. Save the flow with name Add Record to multiple Chatter Group and close the canvas.
It’s time to test this flow
In the next article Call a flow from publisher action I will show you how you can use this flow as Publisher action
1. For time being to test this flow we will hard code the Opportunity Id into flow variable {!VarTOpportunityID}

2. Click on Save button and then click on Run button available on flow canvas. Select as many as Chatter Groups you want, as shown in the following screenshot I have selected 4 Chatter Groups

Once done Click on Next button.
3. To see the result, open the Opportunity detail page and navigate to Groups related list

Note :- In the next article Call a flow from publisher action I will show you how you can use this flow as Publisher action. I will suggest you to Implement this first on your developer org test it and then move it to Production.
Post a Comment