In Salesforce Queue and Public Group represent group of users. We can add any number of users to Queue orPublic Group. There is no limitation on the number of members per Public Group. This is a daily job of Salesforce admin to Add/Remove users from a queue or public group. As you aware that Form Salesforce1 or SalesforceA app we can’t Add/Remove user from the Queue or Public Group. Now let’s start with a business requirement.
Business Use case :- Higher management in Universal Container wants to develop an application for Salesforce1, from where they can easily Add/Remove user from the Queue or Public Group.
Solution of above business requirement
Again this is power of Visual Workflow, we will create an app without using a single line of code. Before proceeding you have to understand Group and GroupMember objects in Salesforce.
- Group :- This Group object represents Queue and Public Group both. Groups are sets of users. They can contain individual users, other groups, the users in a particular role. By using Type field you can distinguish between Queue and Public Group. For Public Group (Use Type = Regular) and for Queue(Use Type = Queue).
- GroupMember :- Represents a User or Group that is a member of a public group.
In our app user will first select, where they want to add/remove user Public Group or Queue then enter User Name in same screen. On the next they will get an option to select Public Group or Queue, User that matches with the User Name entered in the previous screen and action they want to perform Add or Remove. To develop add functionality follow the below instructions
Note:- In this article I will discuss only about add/remove user into Public Group. In similar fashion you can develop for queue. I will also provide Unmanaged package of my app so you can play it within your dev org.
1. Click on Name | Setup | App Setup | Create | Workflows & Approvals | Flows
2. Click on New Flow, it will open flow canvas for you
3. Drag and drop a Screen ( Give the name Select Public Group or Queue and User) on the window,add two fieldswith below details
2. Click on New Flow, it will open flow canvas for you
3. Drag and drop a Screen ( Give the name Select Public Group or Queue and User) on the window,add two fieldswith below details
Name
|
Data Type
|
Value
|
Required
|
Select Public Group / Queue
|
Dropdown List
|
Public Group
Queue |
Yes
|
Enter User Name
|
Textbox
|
Yes
|
5. Drag and drop a Screen ( Give the name Select Public Group and User) on the window, Add one Dropdown List field ( Give the name Select Public Group) create a new Dynamic Choice with below details
- Select Object Group
- Enter criteria Name!= {!$GlobalConstant.EmptyString} and Type = Regular In case of Queue useType = Queue
- Save ID in some variable in my case it’s {!PublicGroupID}, same like below screenshot
- Add Another Dropdown List field to show list of users based on User Name entered in the Screen1.create a new Dynamic Choice with below details
- Select Object User
- Enter criteria isActive= True and Name!= {!Enter_User_Name} (Screen1 User Name input field)
- Save ID in some variable in my case it’s {!UserIDPG}, same like below screenshot
- Add Another Dropdown List field to show the available action i.e. Add or Remove, Same like below screen shot
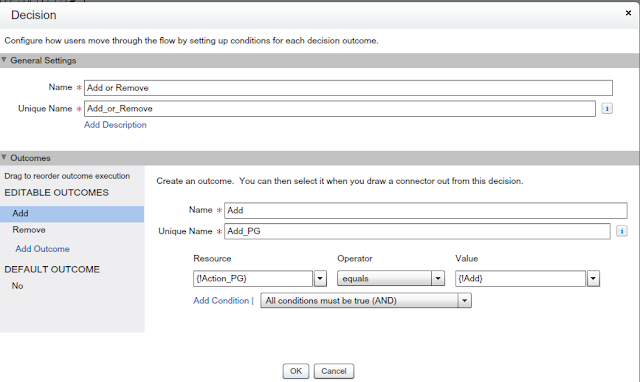
6. Now add one Decision element to decide whether users want to Add or Remove based on that it will preform the necessary action. We will use action field to define a decision. You can take help from below screen shot
7. The final step is performing Add or Removal action, to do this it’s requireed only two ID one is GroupID or Queue ID another is UserID.
- To Add user into Public Group Drag and drop a Record Create onto the window, and map the fields as per below screenshot
- To Remove user into Public Group Drag and drop a Delete Create onto the window, and map the fields as per below screenshot
Finally our flow will look like below screenshot
Use this app on Salesforce1
- To use this app on Salesforce1 , create a Visualforce Page, Select Available for Salesforce mobile apps check box and embed your Flow and crate a Visualforce Tabs to call it. Bel0w is the sample code for your reference
<apex:page >
<br/>
<Center><Font size ="6" color
="orange">Add User Into Public Group or
Queue</font></Center>
<br/><br/>
<style type="text/css">
.FlowText {
color: crimson;
}
.FlowDropdown{
color: limegreen;
}
</style>
<flow:interview
name="Public_Group_Queue"/>
</apex:page>
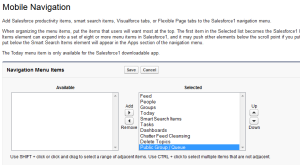
- Add you Visualforce Tabs into selected pane, as shown in below screenshot
It’s time to test this feature
To test this app open your Salesforce1 and navigate to Apps and click on your Tab it will open a Visualforce page for you. Where you have to choose, Queue or Public Group and enter User Name whom you want to add and click onNext, It will look like below screenshot
In the next window you have to select Public Group from the list (List will show all public groups from your organization), User and action you want to perform, click on Next to complete the process. Finally It will look like below screenshot
Install this app
I am offering this app an Unmanaged package, you can install it from below URL
To install this app replace Login with your Salesforce instance name in my case this url will look like


Post a Comment