April 2015

What is an Apex trigger?

Trigger is piece of code that is executes before and after a record is Inserted/Updated/Deleted from the force.com database.
Syntax:
Trigger <trigger name> on <Object name> (trigger Events) {
// Implement the Logic here
}
Types of Triggers:
– Before Triggers
– After Triggers
Before Trigger: Before triggers are used to perform the logic on the same object and specifically we cannot use the DML operation (Insert, update, delete) on these triggers.
These triggers are fired before the data is saved into the database.
After Trigger: After triggers are used to perform the logic on the related objects and these triggers are used access the fields values that are created by system (Ex: CreatedBy, LasteModifiedBy , Record Id etc..).
Bulk Triggers:
By default every trigger is a bulk trigger which is used to process the multiple records at a time as a batch. For each batch of 200 records.
Trigger Context Variables:
All the trigger context variables are prefixed with “Trigger.” (Ex: Trigger.isInsert, etc..)
isInsert: Returns true if the trigger was fired due to insert operation.
isUpdate: Returns true if the trigger was fired due to update operation.
isDelete: Returns true if the trigger was fired due to delete operation.
isBefore: Returns true if the trigger was fired before record is saved.
isAfter: Returns true if the trigger was fired after record is saved.
New: Returns a list of new version of sObject records.
Old: Returns a list of old version of sObject records.
NewMap: Returns a map of new version of sObject records. (map is stored in the form of map<id,newRecords>)
OldMap: Returns a map of old version of sObject records. (map is stored in the form of map<id,oldRecords>)
Size: Returns a integer (total number of records invoked due to trigger invocation for the both old and new)
isExecuting: Returns true if the current apex code is a trigger.
The below table is tells what are the events we can use in the new trigger and old trigger
Trigger EventTrigger.NewTrigger.Old
Before InsertYesNo
Before UpdateYesYes
Before DeleteNoYes
Before UnDeleteNoYes
After InsertYesNo
After UpdateYesYes
After DeleteNoYes
Trigger Context Variable considerations:
– Trigger.Old is always readOnly
– We cannot delete trigger.new
– In before triggers, trigger.new can be used to update the fields on the same object.
– In After trigger, we get run time exception is thrown when user try to modify the fields in the same object.



What is visualforce?

Visualforce is at allows to define umarkup language thser interface components in Salesforce. This is very interesting tool which runs o force.com platform. By using page layouts, we can easily configure User interface. But by using visusalforce pages, you can develop your own customized user interface.

Here in Visualforce Tutorial tutorial I am providing information about, how to work with visualforce pages. Hope this will help you to understand basic of visualforce pages.
To learn more about visualforce page see vf guide 


how to hide approve/Reject links in the home page?


We can hide the approve/Reject links, If we want to restrict the user to approve the record from home page.
If we have implemented logic for the approval process (customized approval process) for that we have to override the all the links (Approve links) and buttons in the details page.
How we can restrict the user to approve from home page.
Steps:
  • Create a StaticResouce “StaticResourceName” upload a JS file. (File extension should be .JS)
var j$ = jQuery.noConflict();
j$(document).ready(function(){
j$(“table.list td.actionColumn”).html(”);
});
  • go to Setup > Home > Custom Links
  • create a new link call it “HideApproveLink”
  • Behaviour = “Execute JavaScript”
  • Content Source = “Onclick JavaScript”
  • at the body enter {!REQUIRESCRIPT(“/resource/StaticResourceName”)}
  • go to Setup > Home > Home Page Components à New
  • call it “HideApproveLink-Box”
  • pick type “Links”
  • click next
  • pick “HideApprovalLink” we created above à save
  • got to Setup > Home > Home Page Layouts
  • add “HideApprovalLink-box” to your layout
  • Click on home Tab you can see the Approva/Reject links are hidden in the page.
We can create a home page component and written script to hide the links. But from summer ‘15 we don’t have the capability to write the script in home page component.


Disabling the command buttons and Grey out the total vf page on any action


How to disable the command buttons and Grey out the total vf page on any action?

Usually we multiple records creates whenever multiple click on save button on custom save button on VF page. So to overcome this issue we can hide the all buttons once user click on buttons.
VF Page:
<apex:commandButton action=”{!doSave}” id=”saveButton ” value=”save” onclick=”disableAllButtons()”/>
<apex:commandButton action=”{!doCancel}” id=”cancelButton” value=”cancel” onclick=” disableAllButtons()”/>
<Script>
var j$ = jQuery.noConflict();
function disableAllButtons(){
j$(“[id$= saveButton],[id$= cancelButton]”).hide();
}
function showButtons(){
j$(“[id$= cancelButton],[id$= saveButton]”).show();
}
</Script>
  • showButtons function is to show the button once the action.
  • If we can use the same code for the input fields as well which have the action function. So that we can restrict the user to change the field and click the buttons immediately.
  • Some times we have to restrict the user to modify the fields on that page after click on button or change on any fields of having action function.
So, here we have to grey out the total VF page to restrict the user to change the fields if any action is In-progress.
The below code is to grey out the page. Gering out the backgrouond,status box and all tex boxes in the page.
<apex:commandButton action=”{!doSave}” id=”saveButton ” value=”save” onclick=”disableAllButtons()”/>
<apex:commandButton action=”{!doCancel}” id=”cancelButton” value=”cancel” onclick=” disableAllButtons()”/>
<div id=”processingSimbol” style=”display:none;”>
“Processing…….”     </div>
<Script>
var j$ = jQuery.noConflict();
function disableAllButtons(){
j$(“[id$= saveButton],[id$= cancelButton]”).hide();
j$(“# processingSimbol “).show();
j$(“[id$=formId]”).append(j$(“<div>”,{“id”:”blurybackground”})
,j$(“<div>”,{“id”:”statusBox”})
.append(
j$(“<img>”,{“src”:”/img/loading32.gif”}),
j$(“<div>”,{“id”:”textBox”}).text(“{!$Label.MDF_Status_Processing}”)));
}
function showButtons(){
j$(“[id$= cancelButton],[id$= saveButton]”).show();
j$(“#blurybackground, #statusBox”).remove();
if(globalFocus != null){
globalFocus.focus();
if(globalFocus.attr(‘class’).indexOf(‘amountInput’)!=-1){
var focusId = globalFocus.attr(‘id’).split(‘:’).join(‘\\\\:’);
setTimeout(function(){
j$(“#”+focusId).focus();
},300);
}
}
}
</Script>
<style>
#blurybackground {
z-index:1000;
//bottom:0;
position:absolute;
left:0px;
top:0px;
width:100%;
height:100%;
text-align:center;
vertical-align: middle;
background-color: #222;
opacity:0.6;
filter:alpha(opacity=60);
}
#statusBox {
// for Modzilla
-moz-background-clip:border;
-moz-background-inline-policy:continuous;
-moz-background-origin:padding;
-moz-border-radius-bottomleft:5px;
-moz-border-radius-bottomright:5px;
-moz-border-radius-topleft:5px;
-moz-border-radius-topright:5px;
-moz-box-shadow:1px 6px 5px #888888;
-webkit-border-bottom-left-radius:5px;
-webkit-border-bottom-right-radius:5px;
-webkit-border-top-left-radius:5px;
-webkit-border-top-right-radius:5px;
-webkit-box-shadow:1px 6px 5px #888888;
box-shadow: 1px 6px 5px #888888;
z-index:1000;
background:#FFFFFF none repeat scroll 0 0;
height:42px;
width:150px;
left:45%;
top:35%;
padding-left:15px;
padding-top:11px;
position:absolute;
vertical-align:middle;
}
#textBox {
margin-left:40px;
margin-top:-20px;
font-weight:bold;
font-size:14px;
}
</style>


Visualforce page to add multiple records


Adding multiple records:

Generally by using standard salesforce tab you can enter only one record at a time form UI. I don’t want to enter single record at a time. I want to enter multiple records at time. How can we achieve this? We can achieve this by using simple visual force page.
Example: I want to enter multiple accounts in single  save. See the below visualforce page.
Visualforce page:
<apex:page Controller=”AddmultipleAccountsController”>
<apex:form >
<apex:pageBlock >
<apex:pageBlockTable value=”{!listAccount}” var=”acc”>
<apex:column headerValue=”Account Name”>
<apex:inputField value=”{!acc.Name}”/>
</apex:column>
<apex:column headerValue=”Account Number”>
<apex:inputField value=”{!acc.AccountNumber}”/>
</apex:column>
<apex:column headerValue=”Account Type”>
<apex:inputField value=”{!acc.Type}”/>
</apex:column>
<apex:column headerValue=”Industry”>
<apex:inputField value=”{!acc.Industry}”/>
</apex:column>
</apex:pageBlockTable>
<apex:pageBlockButtons >
<apex:commandButton value=”Add Accounts Row” action=”{!addAccount}”/>
<apex:commandButton value=”Save Accounts” action=”{!saveAccount}”/>
</apex:pageBlockButtons>
</apex:pageBlock>
</apex:form>
</apex:page>
Controller related to above page:
public class AddmultipleAccountsController {
Account account = new Account();
public list<Account> listAccount{ get; set; }
public AddmultipleAccountsController()
{
listAccount=new list<Account>();
listAccount.add(account);
}
Public void addAccount()
{
Account acc = new Account();
listAccount.add(acc);
}
public PageReference saveAccount() {
for(Integer i=0; i<listAccount.size(); i++)
{
insert listAccount;
}
return Page.Allaccountssaved;
}
}
Visualforce page Allaccountssaved( using this page above controller):
<apex:page sidebar=”false” showHeader=”true”>
<center><h3>Congrtas your accounts are successfully saved!!</h3></center>
</apex:page>
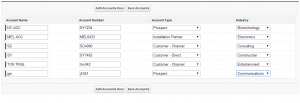
Output of above example:
Multiple records
Here Add Account row is used to enter one more account and Save Account is used to save all account records you entered. See below screen, you can understand functionality of Add Account Row button.
Multiple
After saving you will get below screen.
Multiple 3
This is simple example to explain how to enter multiple records at time form UI.

MKRdezign

Contact Form

Name

Email *

Message *

Powered by Blogger.
Javascript DisablePlease Enable Javascript To See All Widget