May 2015

In Salesforce a user can follow Chatter groups or Records. The chatter group manager can add/remove peoples to the group, for this Salesforce provides out-of-the box functionality. To manage record follower/SubscriberSalesforce does not have any inbuilt functionality like to create few rule for auto Follow or Unfollow records. OnChatter  a user can follow maximum a of 500 Peoples, topics, and records. To effectively manage Chatter, an organization has to use some App to auto unfollow records.
Business Use case :- Higher management in Universal Container wants to develop an app, so when an Opportunity is updated with Closed-Won/Closed-Lost all followers will automatically remove.
Solution of above business requirement
I think this is a good use case to start with Headless  flow. After Summer’14 release sObject variables, sObject collection variables, and loops in a flow will be generally available. To solve this requirement we will use Visual Workflow, Workflow rule to fire Flow Trigger. Before going ahead with the solution you have to understand aboutEntitySubscription Object. It’s Represents a subscription for a user following a record or another user. User can subscribe to a record or to another user.
Field NameDetails
ParentIdID of the record or user which the user is following
SubscriberIdID of the User who is following the record or user
To develop this application follow the below instructions
  • Click on Name | Setup | App Setup | Create | Workflows & Approvals | Flows
  • Click on New Flow, it will open flow canvas for you
  • First create a variable with name OppID and we will use into the flow, From Workflow we will pass the Opportunity ID into this variable
  • Drag and drop a Fast Lookup( Give the name Find all Followers ID) on the window
    • Select Object EntitySubscription
    • Enter criteria ParentId{!OppID.Id}
    • Save ID in Sobject Collection variable in my case it’s {!OppSubcribersID},same like below screenshot


To Get all EntitySubscription ID for Closed Opp

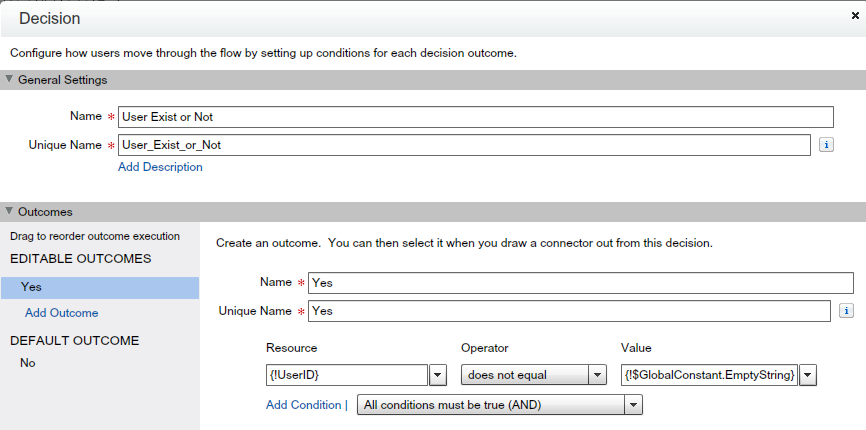
  • Based on the Sobject Collection {!OppSubcribersID} we will decide Visual Workflow next action.  Now add one Decision element to decide whether closed opportunity has any follower or not based on that it will perform the necessary action. If  Sobject Collection variable {!OppSubcribersID} not equal to null it means record have some followers. You can take help from below screenshot to create Decisionelement


Decide What to do Next Remove follower or do nothing

  • The next task is to delete all followers from opportunity record. To do that Drag and drop a Fast Delete( Give the name Remove Subscribers) onto the window, and select Sobject Collection variable{!OppSubcribersID}, as shown in the below screenshot


Delete Follower Records

  • You have to add some action for default Decision action what happen If an Opportunity doesn’t have any followers. I used Assignment Logic because if an Opportunity doesn’t have any followers I don’t want to perform any action. You can take help from below screenshot


For Decision action Do Nothing

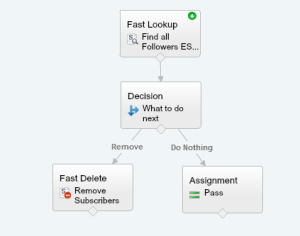
  • Finally our flow will look like the below screenshot
Auto Remove Followers From Closed Opportunity
  • Save the flow with name (Remove Followers From Closed Opp)  and close the canvas.
Create Workflow rule to fire our Flow
Our next task is to create a workflow on the Opportunity object on creation and every time it’s edited event. To create a workflow on the Opportunity object follow the below instructions
1) Click on Name | Setup | App Setup | Create | Workflows & Approvals | New Rule
2) Select object Opportunity from the drop-down
3) Enter Name, for Evaluate the rule when a record is select created, and every time it’s edited, For Rule Criteriaselect is StageClosed Won,Closed Lost, as shown in the below screenshot


Workflow Rule on Opportunity Won or Lost

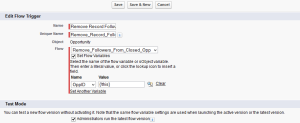
4) Add one Immediate Workflow Actions i.e. New Flow Trigger and Select Flow and set Variable (OppID) value as shown in the below screenshot


New Flow Trigger Action

5) Save the workflow and activate it.
It’s time to test this feature
To test this application follow the below steps
1) Navigate to Opportunity which is not Closed and followed by a few users, like below screenshot


Open Opportunity with some followers

2) The next task is to update the stage to Closed-won, all followers are removed by Flow that we developed as shown in the below screenshot


Opportunity after Closed Won

Note:- If you want to increase this limit log a support case with Salesforce.com.


After Spring’14 release you can be able to post in  Chatter Group Directly from your mail inbox. It’s doesn’t require your Salesforce credentials. You can can only email your posts to Chatter groups that you have access to. So what about Post to Chatter by sending an email feature. Salesforce doesn’t have any out-of-box features for this. In this article I will show you how you can easily develop this app for your organization without writing a single line of code.
Business Use case :- Higher management in Universal Container wants a way to post to chatter by sending an email.
Solution of above business requirement
To solve above business requirement I will use Email-to-caseVisual workflow and Flow Trigger. I will not use a single line of apex code.  It’s very easy to implement, any Salesforce admin also can implement this for their organization. I will first configure email-to-case then I will use Visual workflow and Flow Trigger to create Chatter Post. Before proceeding you have to understand FeedItem objects in Salesforce.  For text post we need these three values
1) Body :- This is the message that appears in the feed.
2) ParentId :- ID of the object type to which the is related. For example, set this field to a UserId to post to someone’s profile feed, or an GroupId to post to a specific Group.
3) Type :-  The type of FeedItem . In our case it’s Textpost.
4) CreatedById :- It’s field contains the ID of user who is creating Chatter post.
To implement this for your organization follow the below instructions
1) Add one more value (Chatter) in Case Origin drop-down, by follow the path Name | Setup | App Setup | Customize | Cases | Fields same like below screenshot
2) Setup a new Email-to-Case, In Case origin drop-down select Chatter as shown in below scree shot


Setup Email-to-Case
Setup Email-to-Case

You will get an email from Salesforce to specified email address in email-to-case with a verification link, click on it and verify your email address. Now you can raise a case thorough email. Whenever you create a case via email, Email of subject –> Subject (Case Object),  Body of email –> Description (Case Object),  Case Origin set whatever you selected in email-to-case configuration (In our case it’s Chatter), Email –> Web Email (Case Object), Name –> Web Name (Case Object).
3) Click on Name | Setup | App Setup | Create | Workflows & Approvals | Flows
4) Click on New Flow, it will open flow canvas for you. Create Three text type variable UserID, EmailAddress andDescription (to pass email address from the case, Description to pass body of email through Workflow Rule Flow Trigger action) as shown in the below screenshot


Variables
Variables

5) In this step we will verify weather EmailAddress associated to any of the user’s account or not. To do that drag and drop a Record Lookup( Give the name Get User ID) onto the window and map the fields according to below details
  • Select Object User
  • Enter criteria Email= {!EmailAddress} (Variable)
  • Save ID of user in a variable ID= {!UserID} (Variable), as shown in the below screenshot


Get User ID
Get User ID

6) Next step is to verify weather variable {!UserID} have some value or not. If it’s null then it means no user exists with the same email (From email comes) address so discard the email. To do that drag and drop a Decision Element( Give the name User Exist or Not) onto the window and one Outcome same as below screenshot


Decision to know weather user exist with same email address

7) Final step is to create Chatter Post. To do that drag and drop a Record Create( Give the name Create Chatter Post) onto the window and map the fields according to below details
  • Select Object FeedItem
  • Map the field Body= {!Description} (Variable)
  • CreatedById= {!UserID} (Variable)
  • ParentId= {!UserID}(Variable)
  • Type= TextPost, Don’t save Id of record into any variable. You can take help from below screenshot


Create Chatter Post
Create Chatter Post

7) Finally our flow will look like below screenshot
Post to Chatter by sending an email Flow
8) Save the flow with name (Email to Chatter Post)  and close the canvas.
Create Workflow rule to fire our Flow
Our next task is to create a workflow on Case object on create an event. To create a workflow on the Case object follow the below instructions
1) Click on Name | Setup | App Setup | Create | Workflows & Approvals | New Rule
2) Select object Case from the drop-down
3) Enter Name, for Evaluate the rule when a record is select Created, For Rule Criteria select is Case Origin=Chatter, as shown in the below screenshot


Workflow Rule on Case Creation when Case origin equals Chatter

4) Add one Immediate Workflow Actions i.e. New Flow Trigger and Select Flow and set Variable (EmailAddress, Description) value as show in the below screenshot


New Flow Trigger Action

5) Save the workflow and activate it.
It’s time to test this feature
To test this application follow the below steps
1) Copy Email Services Address from email-to-case
2) Open your email account (Email address that is related to your Salesforce user account)
3) Under To Address paste email Services Address type subject and under email body write a comment that you want to post to chatter, same as below screenshot


Email (Post to Chatter by sending an email)

4) Now login into Salesforce Navigate to Chatter tab and check your post, below is the proof


Post to Chatter by sending an email

Announcement:- If you like this blog or you have a question please leave your comments, I’ll try to answer it. Thanks for your time to read my article.


Chatter Topics helps you to associate your updates with other posts and comments on the same topic by using ahashtag (#). By using hashtags, you create a topic link that categorizes your update so other users in your company can find it more easily. You can also use Chatter Search to find updates and comments that match the Chatter Topicyou are looking for. Now I am coming to the point way to delete Topics in SalesforceIn Salesforce document it’s mentioned People with the “Modify All Data” or “Delete Topics” permission can delete topics using the Chatter APIor the SOAP API. Another way to delete Topics is use Developer console or Workbench.
Business Use case :- Higher management in Universal Container wants to develop an application, from where they can easily delete Topics. Their system administrator frustrated from the old way from where every time they have to query to delete topics by using Developer console or Workbench.
Solution of above business requirement
Again this is power of Visual Workflow, we will create an app without using a single line of code. Our app starts with a screen where the user can enter topic he/she want to delete, as soon as he/she can delete next topic will delete from Salesforce. To develop add functionality follow the below instructions
  • Click on Name | Setup | App Setup | Create | Workflows & Approvals | Flows
  • Click on New Flow, it will open flow canvas for you
  • Drag and drop a Screen ( Give the name Enter Topic) on the window,add one field ( Give the nameEnter Topic Name) and make it required as shown in below screenshot


Enter Topic Name
Enter Topic Name

  • The next work is deleting entered topics. Before going ahead you have to understand about TopicsObject. It represents a topic on a Chatter post or record.
  • Drag and drop a Record Delete ( Give the name Delete Topic) on the window. Under object selectTopic, and map Name –> Input field from last screen. as shown in below screenshot


Delete Topic
Delete Topic

  • Finally our flow will look like below screenshot


Flow for delete topic

  • Save the flow and close the canvas.
Add Visual workflow into the home page component
We can call flow from custom button, link, sub-flow, Visualforce page. Here we will call our flow from the home page component. To do that follow below instruction
  1. Create custom link from Name | Setup | App Setup | Customize | Home | Custom link
  2. Add custom link in the Home page component
  3. Add Home page component into the Home page layout


Add flow on hope page layout
Add flow on home page layout

It’s time to test this feature
Now we will delete Chatter Topics through our app. Currently I have three topics in my Org you can see below screenshot.


Topics available in my org

Open our app and enter Topics  that you want to delete. In my case I am going to delete Topics  chr and click on theNext, as shown in below screenshot


Enter Topic Name and click on next

Now check Topics, as shown in below screenshot


Final Output
Proof of concept

Note :-When deleting topics, consider below points
  1. Topics are hard deleted. They aren’t sent to the Recycle Bin.
  2. Deleted topics are removed from search results, the topics list, all posts and records, Recently Talked About topics, Related Topics, and your users’ favorites. Deleted topics are removed from Trending Topics after the next calculation.
  3. Deleted topics are not blacklisted. Users can reintroduce a topic after it’s been deleted.
Use this app on Salesforce1
  • To use this app on Salesforce1 , create a Visualforce Page, Select Available for Salesforce mobile apps check box and embed your Flow and crate a Visualforce Tabs to call it. Below is the sample code for your reference
<apex:page >
<br/>
<Center><Font size =”6″ color =”orange”>Delete Chatter Topics</font></Center>
<br/><br/>
<flow:interview name=”Delete_Topics”/>
</apex:page>
  • Now navigate to Name | Setup | Administration Setup | Mobile Administration | Mobile Navigation
  • Add you Visualforce Tabs into selected pane, as shown in below screenshot


Add Visualforce Tab into Mobile Navigation

It will look like below Screenshot on Salesforce1 App


Delete Topic App on Salesforce1

Alright, we’re down to the home stretch, and it’s probably the easiest part!

Remember, List Views are the User Interface for Dynamic Reports.  You should direct your users to the Dynamic Reports tab (which you’ll have to set up BTW), and grant them access to the List Views that are pertinent to their job or role.

There’s really three parts to setting up the list views, that should be simple for any Salesforce admin.

1 – Specify Your List View Filter Criteria
OK, remember all those fields you added to your Dynamic Reports object?  Some may have been user fields, others may have been lookups to other fields on the User record.  These are the fields you use to set up your list views!
On the example below, I only want to show records (user records) when the person is a Regional Sales Manager (RSM), they are in the East sales region and their user record is Active.  All three of those fields were fields I created that are lookups to the custom or standard fields on the Salesforce.com user record.
2 – Select the Fields (and Reports) to Display on Your List View
As you add fields to the List View, I add the Variable field (in this case, User Name) and 1 or 2 other characteristic fields, like Region or District, to the left side of the List View.
And on the right side, I add all the Report Link fields I created for this audience.  This is why I like to keep the link names short – so I can fit several on a page.
3 – Assign / Restrict Visibility to Your List Views

The last step is to grant access to this List View to the audience (Roles or Groups) that need access to it.  I usually grant upper Sales Management access to all the List Views, but each Sales Team only gets access to their own views.

If you’ve got 5 or 6 sales regions, then you just “Edit / Save As” your main List View, and update the Filter Criteria and Visibility selections for those teams.
Security
By now, you’ve probably figured out that you can control security using common Salesforce methods:
  •  Your role hierarchy, security model and data model are all enforced within Dynamic Reports.
  • You should grant all users who will use DR’s access to the DR object and DR tab.
  • All fields in DR should be viewable by all users.
  • Primary access to specific List Views is managed in the Edit List View Screens.
  • Your report folder security settings will impact whether your users can view the reports.
 And that’s it!  Hopefully, this can be of value in your organization too!
Please feel free to post any comments or questions on these pages, and I’ll do my best to respond as quickly as I can!


Chances are, you’ve already created most of the reports that you’ll use as the baseline for your Dynamic Reports – in fact, you’ve probably created several versions of them for different users or teams.
You can use clone of these reports to make your first Dynamic Report.
As you build your reports, put all the other fixed variables in your report filters, except the one(s) you’re going to pass from the Dynamic Report List View.  For example, if you want a sales pipeline report for the next 12 months for your sales reps, put the close Date, Opportunity Stage and other criteria in your report.

For the variable to be passed from the List View, you will add that filter criteria field to your report, but leave the value blank!

Pay close attention to your filter Operator – for Dynamic Reports it will usually be “equals” or “contains”. You would use contains primarily on fields with Editable list views, where your user may enter a value like an Account Name.
Then count the number of custom filter criteria you have below the standard drop-down criteria.  The first Filter will be pv0, the second filter will be pv1, the third will be pv2 and so on.  Your Report Link will pass the field from the Dynamic Reports object to the variable row you specific in the formula.
Report Folders & Permissions
I would recommend creating new read-only report folders for each type of Dynamic Reports you’ll be building, ie:
DR: Sales Rep Reports
DR: Account Reports, etc.
Remember, if your users don’t have access to the Report Folders, they will get an error when they click the links on the Dynamic Reports page.
I recommend setting fairly broad security settings on the Dynamic Reports folders – your security model remains in place, and you can control access to Dynamic Reports through the list views you create.  Alternatively, you could create Dynamic Report folders to align with your Dynamic Report list views.
Next Up… List Views and Security!

OK, here’s where we really get into the details.

FIELDS
The Fields in your Dynamic Reports (DR) object are basically three different types:
  • Variables that will be passed to reports,
  • Variables that are used to filter List Views,
  • Hyperlinks to reports.

Variable Fields
1.  Identify the variables that you will want to dynamically pass to your reports.  These can either be records that exist within Salesforce, like users, products or accounts, or they could be pick list values like Region, Product Category, time frame etc.  They can be lookup fields, text fields, numbers or dates.
You can also use formula fields as variable fields in your Dynamic Report object.  For example, to create my List Views for East and West, I created a ‘Region’ field on the DR object, which is a Lookup field to the Region field from the Sales Rep’s SFDC User record.
The fields can be from on multiple objects in your Salesforce instance – Accounts, Opportunities, Cases, Users, Leads, or any other custom of standard object.  And some fields may be used in some list views, but not in others.
If you really want to get creative, you could create Variable Fields that are text boxes or Picklists in Dynamic Reports.  For example, you could create a text field called “Account Name” to let your users enter a partial account name to match.  Or you could create a picklist field that holds the different variables for that field you may want to pass, like a Product Category, or a date Parameter like “This Month”, “Next Month”, “This Quarter” or “Next Quarter.”  If you want to take this approach, you will need to set your permissions to Allow Editable List Views, and allow your users’ profiles to update Dynamic Reports records.

2.  Next, identify the variables you’re going to want to use to build different list views on your Dynamic Reports.  This could be things like user roles or titles, or region.  Generally, these will be variables that delineate one list view from another.
For example, you may want to have an East list view and a West list view.  Therefore Region should be one of your fields.
Report Link Fields
The other main set of fields you will be building are the fields that launch your reports.  You’ll need one of these fields for each Report you’ll be launching.
This involves a little bit of creative URL hacking, but it’s very similar to creating a Custom Report Link on an object (reference).  But these links are more powerful, since your Dynamic Report fields can reference data from any or multiple objects.
There are formula fields with a Formula Return Type = Text.
Here’s the formula, then I’ll break down the components:
= HYPERLINK(“/00OC0000005KjI0?pv2=”&User_Name__c ,”Open Opps”)
HYPERLINK(“/This is the beginning of the formula, which will convert the result into a clickable link
00OC0000005KjI0?This is Salesforce page ID for your report, copied directly from the URL bar in your browser
pv2=”&User_Name__c ,pv stands for ‘passed variable’ and the number is sequence of the Field Filters on your report; see the image for more info.And in this case, User_Name__c is the field from the Dynamic Reports record that we’ll be passing into the report
“Open Opps”)And the text between the quotes will be the link you click to run the report.
The URL format here will open the report in a new browser tab.  I find this useful, since my Sales Managers can keep the DR List View open and run all the relevant reports for each Sales Rep, then just close those tabs when they are done.
The great thing about this is to create new Report Link fields, you just have to Copy / Paste the URL from one field when you create another, and change the following components of the formula field:
– the 15 character record id of the called report
– the variable sequence (pv0, pv1′ etc.) from the report
– the value (field) from the dynamic report record that you are passing
– and the short text label that will display in the Dynamic Report list view
Here’s a few important tips when building these report links.
  • Keep the Field Name short – the Field Names will be the column headings on your List Views, so you don’t want them too wide.
  • I put a period in front of each report field name, so I can easily identify this as a report link field, and group them together on the custom object.
On your page layout, you may want to create a layout section for each type of report, like Sales Reports, or Case Reports, just to help you keep things organized.
Here’s a couple screenshots / images that will help explain these concepts:
Sample Dynamic Reports page layout, showing the different field types.

A graphical representation of how to build a report link formula field.
RECORDS
This part is kind of tricky.  Each Record that you add to your Dynamic Reports field exists for the sole purpose of launching a report with a variable from that record.
My primary reason for creating Dynamic Reports was to launch reports for different sales reps, which are Salesforce User records.  You can use it for any type of user record referenced on an object, i.e. Case Owner, Lead Owner, Sales Manager, etc.
Or you may want to create records for different product categories, States in a region, or other variables you commonly report on.
I would recommend you make very few fields required on Dynamic Reports, since not all variables will apply to all reports, and your admins should be the only ones adding records.
You may end up with a lot of records in your DR object.  I would recommend you check all your List Views often, so you make sure the views are displaying the records you want.
Static Records
I use Static Records if I want the variable name to always appear on the List View.
For example, in my instance I have a record for every Sales Rep, so I can build list views for my Sales Managers that show all their reps on one page.  When a new rep comes on board, we have to add a record fore that user to Dynamic Reports.  When we launched Dynamic Reports, we imported all the Sales Reps User Ids into Dynamic Reoorts.  But when a Sales Rep leaves the company, I don’t have to delete the record, because my List View filter only looks for Active Sales Reps.
Editable Records
You could also create Variable Fields that are text boxes or Picklists in Dynamic Reports.  The advantage here is that you don’t have to create a DR record for each possible variable you’d want to report on.
But, as I mentioned before, you’d have to set your permissions to Allow Editable List Views, and Allows your users’ profiles to update Dynamic Reports records.
You should also make sure that only Admins have Add or Delete privileges on DR records.  Your users will only be using Dynamic Reports to launch reports from List Views.
IMPORTANT – the actual records in the Dynamic Report object will be meaningless to your users.  Their main interface to this object is the List View.  If a user opens up a Dynamic Report record, they’ll see a bunch of field and report links that don’t make sense to them, because every record will have every variable and report link field you’ve created, regardless of whether it’s pertinent to their list views or not.
What I have done is to make sure the Dynamic Report List Views I make available to my users don’t have any links to the record – no Record ID field or Record Name field is displayed.  That way, they can ONLY click the report links.
BUT, I did make an Admin List View, with links to records, accessible only to me and other admins, so we can get into the records and troubleshoot any issues.

MKRdezign

Contact Form

Name

Email *

Message *

Powered by Blogger.
Javascript DisablePlease Enable Javascript To See All Widget