Latest Post


For those of you who are quick studies, I’ll lay out the general concepts here in bullet form, and we’ll dive into the details in subsequent posts.
Dynamic Reports (DR) is a Salesforce.com custom object, designed specifically to allow users to quickly launch commonly used reports, passing variables like User Name or Account Name to the reports.

The List View is the main user interface for Dynamic Reports.
  • All links to reports are launched from the List View.
  • All reports open in new browser tabs.
  • You can make customized list views  (report launchers) for each “audience” of users.
Fields in the DR object are primarily 3 things:
  • Variables that will be passed to reports,
  • Variables that are used to filter List Views,
  • Hyperlinks to reports.
Security
  • Your role hierarchy, security model and data model are all enforced within Dynamic Reports.
  • You should grant all users who will use DR’s access to the DR object and DR tab.
  • All fields in DR should be viewable by all users.
  • Primary access to specific List Views is managed in the Edit List View Screens.
  • Your report folder security settings will impact whether your users can view the reports.
  • I suggest creating new report folders for your DR’s, separate from your existing reports.
We’ll get into more details on the next couple posts!


Let’s face it, if you are reading this blog, then you are a Salesforce geek, at least to some extent.  While I’ve got responsibility at work for a wide range of sales operations functions (sales compensation, sales process, budgeting, etc.), I will admit I still geek out on Salesforce.  I love the platform, and I often challenge myself to come up with creative solutions to business problems.
To quote some TV commercial, the concept presented here, – Dynamic Reports – is my “A-ha!” moment!   Once this idea came to me, I couldn’t stop thinking about it for days.

Using standard Salesforce functionality, with a couple tricks, I was able to create a simple, easy to use solution that would save my users lots of time, literally every day!
Now it may not seem that simple if it takes a 5-part post to explain, but I want to make sure I fully explain the concept and how to implement it, so you can take advantage of it in your organizations.  (Honestly, it took me more time to write these blog posts than it did to create the Dynamic Reports object).
So now…. on with the post…
———-
The Challenge…
Some of my best ideas come while I am sitting in on sales account reviews.
About six months ago I was in an account review, watching a sales manager go through the same six reports with eight different sales reps.  For each rep, the manager would pull up a Salesforce report, change the sales rep name, and run the reports to look at key sales metrics like opportunity pipeline, recently closed opportunities, new pipeline added, etc.
As I was sitting there, I wondered if I could build a web page, maybe in Google sites, to allow the Sales manager to just click a few links and launch ALL the reports he needs to assess the sales rep’s performance.  Maybe there was a way could leverage the custom report links that I’m sure many of us have used on page layouts (as documented in this Salesforce.com Tip Sheet.)
But that would require a lot of maintenance – adding and deleting hyperlinks on the Google page as sales reps come and go.
Then it occurred to me that any variable (like Sales Rep name) that I would want to report onalready exists in Salesforce.  Could I build a custom object to manage these report variables?  l knew I could launch an Opportunity page from a List View… But could I launch a report from a list view? And could I pass a variable to that report?
After a couple hours tinkering around in my Sandbox…. A-ha!  I got it! 
The Solution:
A new Dynamic Reports object, with secure, custom List Views for each Sales VP or Manager, that acts as a report launcher for our most common sales reports.  AND the concept can be extended to just about any custom or standard object, all within the same Dynamic Reports object.
There a sneak peak of the Dynamic Reports main page at the top of this page.  Hopefully, you’ll see the value in it right away.  On the next post, I’ll explain how it works, and then I’ll tell you how to build it.

Ok, maybe the title is a little dramatic, there is a chance you know about some of these tricks... but I bet you don't know all of them! If you do, I'll give you your money back. So, these are just some cool tricks that I've picked up from the salesforce community and I thought it would be cool to pass them along. Enjoy.

1. Auto-number Switcharoo

Myth: Auto-number fields only ever contain the numbers which the field has generated on its own. The truth is, you can jam anything you want in there! The loophole you use to do so is that you can change the "field type" of a field from Auto-number to Text or from Text to Auto-number. So for instance, you can change an Auto-number to Text temporarily so you can modify some of the numbers that had been assigned previously, and then change it back to Auto-number so it will continue assigning numbers to new records. I have done this during migrations before so I can allow the migrated data to retain their assigned numbers in the previous org. Give it a whirl, it's fun! Be careful though, while you have the type set to anything other than "Auto-number" records will be created without getting a number assigned.

2. Change a User's Email Address Without Sending a Confirmation Request

Usually, when you change the email address on a user record an email is sent to the new value asking the user to confirm the change. Only when the confirmation link in the email is clicked will the change be reflected in salesforce. This happens regardless of how you update the email address... manually, API, etc. There is no way around it... or so I thought! Turns out, if you change the email address AND check the "Generate new password and notify user immediately" checkbox (all the way at the bottom of the edit screen) then the email address gets committed right away, no confirmation needed! Obviously the catch is that the user then gets sent a new password... so it's not any better in some situations. I use this trick a lot in sandboxes.
You know how it is, you tell a user what their username is in the sandbox and tell them to use whatever password they were using in production when the sandbox was last refreshed... and they don't remember and ask you to reset it... so you'd have to explain that they need to confirm a change to their email first... you get the picture. Now you just update the email and get them a new password in one shot.

3. Mass Email Activity Ghostbusting

The scenario is that you send mass email to leads or contacts, and you select the option to "store an activity for each mail". Then after the mailing completes, you check out the activity history on one of the recipients and see the subject of the task shows as "Mass Email:" as illustrated below. The colon in there lets you know that something is meant to be there, but didn't quite make it there. Spooky...

So the secret (I found out years later) is that the activity stored reflects the description of the email template you send. Strange right? So give your email templates descriptions from now on before you send any mass mail... your activity histories will thank you.

4. Id Growth Formula

This one is an oldie but goodie. Although you probably know the deal, I'll give the background info in case you don't. Salesforce gives all records an 18 character Id, but sometimes they show up only as 15 characters. This is because if you are working in a case-sensitive system, the first 15 characters is enough for it to be a unique Id... but if you have the last three characters also, then even if you ignore the case the Id is still unique. Ok, so obviously to go from 18 characters to 15 you just drop the last 3 characters. The cool part is, that if you have the 15 character Id you can generate the last three characters to compose the 18 character Id. Here is an apex snippet that does the conversion.
Also, check out this blog post from @ekenigsberg and @AstadiaAShan that gives a formula to do the conversion and explains the mechanics of how the conversion is done... sweet.

5. The Secret Tab Trick

This is a neat trick that came to me from @arrowpointe. As you know, when you create custom objects you can easily create a custom tab which allows you to create views from which you can view and manage the records in the object. Well, it turns out you can do this even if you haven't created a tab. All you have to do is go to your URL bar, and after the ".com/" enter the 3 character prefix of the object. The prefix is easy to find, it is the first three characters in the Id of any record in the object. You do this, and you'll be on a "secret" tab that otherwise you can't navigate to. Here is an example, note the cool little cube logo that shows up :-).


Earning $100, $200 or even $300 per day with Google AdSense is not an impossible job.

Many bloggers and website owners are doing it, and you are not an exception. The only 

thing you need is better planning and execution, hard work, determination and passion for 

blogging about your topic or niche
.
Before diving into the exact process, let’s know some terminology for better understanding 

of Google AdSense and how you can generate more revenue by selling your ad inventories 

on your blog. 


What Is AdSense: It’s a monetization program by Google for online content from websites,

 mobile sites, and site search results with relevant and engaging ads.

CTR : Your ad Click-through Rate is the number of ad clicks divided by the number of 

individual ad impressions. Suppose you are showing 3 AdSense ads on every page, your 1 

page view is equal to 3 ad impressions.

CTR = Clicks / Ad Impressions X 100

Suppose, you get 5 clicks out of 500 ad impressions, your CTR would be 1% (5/500X100).

CPC : Cost-Per-Click is the revenue you earn each time a visitor clicks on your ad. CPC is

 usually determined by the advertisers. In some competitive niches like finance, marketing,

 online products etc. advertisers may be willing to pay more per click than others.

CPM: CPM means “Cost Per 1000 Impressions.”

Sometimes advertisers opt for CPM ads instead of CPC and set their price for 1000 ad 

impressions. And they pay each time their ads appear on any website.

Let’s Make $100 Everyday With Google AdSense, Right?
For the convenience of calculation we assume that – You serve your AdSense ads on your

 blog or website, irrespective of showing your ads on your mobile site and added the site 

search results with AdSense.

Your CTR is 1% and your average CPC is $0.25. It’s quite achievable and lots of bloggers

 usually get it. We also assume that Page View = Ad Impression for easy calculation. You 

can manipulate the parameters on your own for desired results.

  • To make $100 everyday you need 40,000 Page Views/day Or, 400 Clicks a day @ 1% CTR and $0.25 CPC. For 40,000 Page Views you have to produce 500 awesome articles or blog posts which attract at least 80 or more page views/article everyday.
  • Apart from CPC, you will also earn from your CPM ad impressions. Irrespective of any niche, the average CPM earning is $1 to $1.5 per 1,000 impressions. You can make $40 to $60 per day easily from 40,000 page views.
  • You can also sell your Ad space directly or via BuySellAds.com and generate $6,000 Per Month on an average from 40,000 page views. Check out how webmasters and bloggers are making $6,000 to $8,000 Per Month from with forty thousand page views per day. So your daily earning will be $200 (6000/30=200).
  • A niche blog with high quality articles converts very well with affiliate marketing. You can easily earn $40 to $80/day from affiliate selling with correct implementation and execution.
Now your total earning per day is $100 + $40 + $200 +$40 = $380 from CPC, CPM, Direct 

Ad Sell, Affiliate Marketing for 40,000 page views per day. I’ve taken the lowest possible 

earnings from all the 4 sources.

$380 per day means $11,400 per month (380X30= 11,400) Or, $136,800 per 

year(11,400X12=136,800). Isn’t it a whooping amount to lead a lavish life?

Which is well above your desired earning of $100 per day from Google AdSense, right? 

1000s of people are making money by writing articles, and you can also do it. The only thing

 I want to say is “Be Focused!”

P.S. The above results can be possible if you produce at least 200 to 250 great articles or 

blog posts per year for 2 years. So how much traffic you actually need to make $100 per 

day from Google AdSense – It’s way less than 40,000 Page Views Per Day!

Source: http://seohour.com/blogging/how-to-earn-100-per-day-with-google-adsense-and-


In Salesforce Cloning is the process of creating records with the same details. Salesforce provides the out-of-box feature to clone object records. It’s a way to create record with similar data and save your precious time. Now I am coming to the point, if some one say’s that they want to clone account with opportunity then you will first think about apex Trigger but no there are other ways this.e Visual Workflow. In this article I will demonstrate how efficiently you develop a deep clone feature for your org.
Business Use case :- Business users in Universal container want a way to clone account with opportunity (Only closed won) and set Close date on the new opportunity to today plus 15days. They have only one closed -won opportunity on each account.
Solution of above business requirement
I took above example only for demo purpose. It may possible your organization maintaining accounts in different ways as mentioned in above business use case. In this blog I will use Visual workflow to solve above business requirement. First of all list down all fields that required to create an account and opportunity, for me to create an account and opportunity it’s required below fields it may vary based upon the custom validation rule
Account
Opportunity
Name
Name
Employee
Stage
Phone
Close Date
Account Name
 To develop add functionality follow the below instructions
  • Click on Name | Setup | App Setup | Create | Workflows & Approvals | Flows
  • Click on New Flow, it will open flow canvas for you
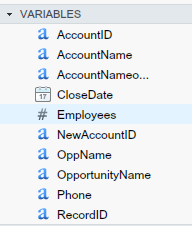
  • First create a variable with name AccountID to pass account ID, create variable for all fields as shown in below screenshot. In CloseDate variable set default value is {!$Flow.CurrentDate} it means today’s date

  • Drag and drop a Record Lookup ( Give the name Account Clone) on the window, to save account field values in variables that you created, as shown in below screenshot

  • Likewise drag and drop another Record Lookup ( Give the name Opp Clone) on the window, to save opportunity field values in variables as shown in below screenshot

The next task is increment  CloseDate variable by 15days, to do this drag and drop an Assignment(Give the name Increment date by 15 days) on the window, and add 15 days as shown in below screenshot

  • Now we will create account record first, to do this drag and drop another Record Create ( Give the name Craete new account) on the window, pass the variable values in the fields and store new account id in a variable in my case it’s  NewAccountID as shown in below screenshot

  • Final steps creates opportunity record. to do this drag and drop another Record Create ( Give the name Create opp) on the window, pass the variable values in the fields. In the AccountId field pass the newly created account id i.e. NewAccountID and select Stage as per your choice, as shown in below screenshot

Finally our flow will look like below screen shot

Save the flow and close the canvas.
It’s time to test this feature
To test this feature you have to create a button on Opportunity to invoke this flow, to do that follow the below instruction
1) Click on Name | Setup | App Setup | Create | Workflow & Approvals | Flow
2) Click on your flow name and go to the detail page and copy URL link
3) Now create a detail page button on Account object and pass  Account id to variable AccountID , same as below screen shot

4) Now go to any account record that have one opportunity with status “Closed won“and click on custom button that you created on last step and see the magic.
Note:- In this demo I used only few fields but you can take as many as fields you want but you have to maintain same number of variables in flow. You can also add check what happen when account does not contains any opportunity.


In the last few articles I have gone through various ways to use Visual Workflow in Salesforce. In this article I will discuss few concepts related to Visual Workflow, that is mentioned below
  1. Validation rule in Visual Workflow
  2. Branding – How to use Image in Visual Workflow
  3. Improve Visual Workflow UI

–> Validation rule in Visual Workflow

Business Use case :- Universal container is creating a Child Donation Screen by using Visual Workflow, Screen contains Name (Text), Phone Number (Text) and Amount (Currency) fields. They want to write a validation rule  onName so user can’t enter any word other than alphabets. For Phone Number field they want a way so the user can’t able to enter more than 10 digits.
Solution of above business requirement
You can use standard Salesforce formula syntax in two places within a flow:
  1. In a Formula resource
  2. In a Screen element, specifically to validate user input for a field
We have to create a new flow.  To develop this functionality follow the below instructions
  • Click on Name | Setup | App Setup | Create | Workflows & Approvals | Flows
  • Click on New Flow, it will open flow canvas for you
  • Drag and drop a Screen ( Give the name Donation Registration) on window, and click on Add a Field ( Use Text Data type field, Give the name Name ) to enter Donor Full Name and make this field require by selecting Required check-box
  • Navigate to Input Validation section and select Validate Check-box, and write validation rules on rectangular box, as shown in below screenshot

Formula I used :- REGEX( Name, “[a-zA-Z ]*$”)
  • Now navigate to Error Message section and write the message you want to display when the formula statement evaluates to False, You can take help from below screenshot

  • You can also use Rich text editor to define error message in a different  font, size and color.
  • Likewise you can create Phone Number (Text) field and write validation rule, you can take help from below screen shot

Formula I used :- ISNUMBER (Phone_Number ) && LEN (Phone_Number ) < 11
  • Create Amount (Currency) and make this field require by selecting Required check-box.
Note:- If the formula statement evaluates to True, the input is valid. If the formula statement evaluates to False, the error message is displayed to the user.
Few points to remember
  • If flow contains an invalid formula, then You can’t activate that flow.
  • The formula expression must return a Boolean value.
  • If the user leaves the field blank, and the field is not required, no validation is performed.
  • A formula in a flow can’t contain more than 3,000 characters
  • Formulas in flows don’t support the below mentioned functions. Using these functions results in your formula returning Null (GETRECORDIDS, IMAGE, INCLUDE, INCLUDES, ISCHANGED, ISNEW, ISPICKVAL, PARENTGROUPVAL, PREVGROUPVAL, PRIORVALUE, REQUIRE SCRIPT, VLOOKUP)

–> Branding – How to use Image in Visual Workflow

Business Use case :-  Higher management in Universal container wants to user their company logo on Child Donation screen for branding purpose.
Solution of above business requirement
The Rich text editor on the screen element currently does not support Image src tags. However, the flow run-time interprets any text as HTML. So, you could store the HTML markup in a custom setting, database record or some variable,  and use that on the screen. In our current approach I am going to store Image src tags on a variable. First you upload image on static resources in Salesforce, now you have the image link, follow the below instruction to complete this process
  • Navigate to Resource tab, and create a variable with name ImageURL, Select data type as Text and under Default Value define an image tag as shown in the below screenshot

Save this Flow and Activate it.

–> Improve Visual Workflow UI

If you are using Visual Workflow on Visualforce Page then you can change following things
  1. buttonLocation :- You can define location of navigation buttons in the flow user interface. Available values are Top, Bottom and Both.
  2. buttonStyle :- You can define style to the flow navigation as a set. Can only be used for inline styling, not for CSS classes
  3. FlowText :- You can define A field label.
  4. FlowCurrency :- You can define A field label.
Note:- To learn more about “Customizing a Flow’s User Interface” click on the URL.


Now create a Visualforce Page and embed your Flow. To change the  label of Text field (Name (Text), Phone Number (Text)) defines one CSS class and use it in Visualforce page
<style type=”text/css”>
.FlowText {
  color: green;
}
</style>
Likewise you can define CSS class different attributes. finally our page looks like below screenshot
You can download the full code from Github or From Chatter. let me know if you are unable to download the code.

MKRdezign

Contact Form

Name

Email *

Message *

Powered by Blogger.
Javascript DisablePlease Enable Javascript To See All Widget